Jetpack Cat is a Tactician Support hero in Overwatch. She was one of the five heroes released in Season 1: Conquest on 10 February 2026, making her the 50th hero to be added to the game.
Overview
Jetpack Cat is a mobile support hero whose kit emphasizes airborne positioning, sustained healing, and battlefield utility. She is unique in that her passive grants permanent flight, allowing her to remain airborne throughout engagements.
-
 3D portrait
 -
 2D portrait

Abilities
Passive Abilities


- Tacticians can charge up to 25% of their next ultimate after reaching 100%.
- This is visible from an orange bar above the ultimate icon in the bottom-middle of the screen.
- Past 100%:
- The additional 25% has a 25% reduced gain rate.
- You will not passively gain ultimate charge towards the extra 25%.

- Moving forward goes in the exact direction Jetpack Cat faces, so looking up makes her fly up and looking down makes her fly down.
- Conversely, moving backwards while looking up makes her fly downwards and looking down while moving backwards makes her fly upwards.
- Additionally, holding jump makes Jetpack Cat fly upwards and holding crouch makes her fly downwards.
- Not affected by
 EMP.[1]
 - Falls to the ground when hindered, knocked down, or frozen, or abilities that cause falling (e.g.
 Downpour,
  Binding Chain,
  Palatine Fang's overhead strike).[2]
 - Jetpack Cat cannot use jump pads nor activate elevators.
- However, anything that causes Jetpack Cat to fall to the ground (such as
 Cage Fight) will allow her to activate jump pads and elevators.[3]
- However, anything that causes Jetpack Cat to fall to the ground (such as
Weapons


8 (center pellet)
4 (per paw pellet)
4 paw pellets
0.3 degrees (close paw shots)
0.9 degrees (far paw shows)
- Damage/healing per second: 107.52 while firing (85.91 w/ reload)
- Does 40 damage if all paw pellets are headshots.
- Each shot is 5 pellets: 1 below the aiming reticle, and 4 above the aiming reticle in an arc. (It makes a paw 🐾 shape.)
- Though the lower pellet appears larger than the others, it is currently unknown whether it has a larger hitbox.
- The lower shot does not deal critical damage.
- At close range, the shots will actually hit completely to the left and right of the aiming reticle (outside the circle).
Special Abilities

25% per second (regen rate)
15% per second (regen rate while carrying a player)
- It takes 4 seconds for Frenetic Flight to fully recharge.
- The ability can be used omnidirectionally.

15 meter height
- Unlike
 Life Grip, allies may choose to interact to be carried by Lifeline.
- The text "Grappled" will appear on the ally's screen while being carried.
- B.O.B. will automatically be carried if in the selection radius.
- If D.Va activates
 Self-Destruct while being lifelined, the self-destructing mech (not the pilot) will continue to be carried. [4]
- For the ally attached to Lifeline, using movement abilities or pressing space will disconnect the tether.
- When disconnected, momentum is carried, allowing for additional movement after use.
- For Jetpack Cat, using primary fire, her ultimate, or pressing the key/button again will end Lifeline.
- However, she can use
 Frenetic Flight and
  Purr while using Lifeline.
- However, she can use
- Cannot carry connected targets through terrain, disconnecting them if they get too far from Jetpack Cat.
- Abilities that require the player to be on the ground to use (Such as
 RIP-Tire or
  Teleporter) cannot be used while being carried in the air by Lifeline.
- They can still be used if tethered while on the ground.

22.5 (per pulse, self)
0.95 seconds (healing pulse rate)
- Pulses once, then twice, then 3 times, then 4 times (10 pulses total).
- The knockback is only applied once when the enemy is within Purr's range.
Ultimate Ability

4 seconds (max ultimate duration)
- Fully recharges Frenetic Flight energy meter on use.
- The ultimate can only be used if targeting a flat surface or slope.
- If used on a wall, it will automatically target the floor below the wall, if in sight.
- Will automatically target the floor at the max range if pointing beyond the range.
- Cannot be used if targeting areas outside the environment, and will instead target the closest surface from that area.
- Jetpack Cat automatically activates
 Lifeline when the ultimate is used: if no enemies are hit, Lifeline will remain active until disabled.
 - Jetpack Cat can use Purr, Frenetic Flight and quick melee while carrying an enemy, but not their primary fire.
- Unlike with Lifeline, connected enemies cannot exit the tether early with movement abilities or jumping.
- Only a very few abilities can break the tether. A few examples are: Life Grip,
 Charge,
  Chain Hook,
  Overrun, and an enemy cat's
  Catnapper.
 - Abilities that you might intuitively expect to break the tether do not (such as
 Cryo-Freeze).
 - However, abilities that dont break tether but do hinder JPC (such as Flashbang) are considered counters.
- Only a very few abilities can break the tether. A few examples are:
- Can be cancelled by Jetpack Cat by pressing Ultimate again or by activating Lifeline.
- Unlike Lifeline, cannot be cancelled by Jetpack Cat pressing primary fire.
- Connected targets can get stuck on terrain, disconnecting them if they get too far from Jetpack Cat.
- If an enemy D.Va has been catnapped, and then activates Self-Destruct, the mech (not the pilot) will remain tethered.
- However, a mech that is already self-destructing cannot be catnapped.
Perks
Minor Perks
A Minor Perk is unlocked at level 2.

- Fuel per second: 16.13% while firing (12.89% w/ reload)

- This activates whether carrying allies or enemies.
Major Perks
A Major Perk is unlocked at level 3.

- If you miss your headbutt, you wont get the additional fuel

- Wound damage counts as a damage over time effect. It can be cleansed and it ignores armor.
Strategy
- General
- Utilize your high-mobility to your advantage. Whether it's finishing off opponents who try run away, or escaping a fight before they can catch you.
- Try stay in your effective range:
 Biotic Pawjectiles has a range, so staying further than that would be pointless.
 Jetpack (Passive)
- Position is key. Whilst you are in constant flight, it makes you more vulnerable to Hitscan heroes who can more easily track you if you stay in the open.
- Use environmental terrain and ally barriers to protect against this.
- Don't stay miles in the air to avoid a fight, instead use your high mobility to enter and exit when appropriate.
- The closer you are to your target, the easier it is to hit them: boosting directly onto an enemy can help maximise your damage. Be careful not to use all your boost's energy, as you'll want to use it to escape if you get too low.
- This is arguably one of the most powerful movement abilities in the Support role, as it's short energy-based cooldown allow you to zip around the battlefield at high speeds.
- If safe, use the high speed to chase down low-health opponents who are trying to run away.
- Since tethering to allies or opponents will cause the energy meter to recharge slower, try be at full energy when using Lifeline, so you can boost the attached target further.
- Coordinate with your team regarding this ability: offering to carry an ally during their ultimate can provide them with the positioning to better secure eliminations.
- Be wary of your team's situation whilst tether to an ally, as it prevents you from using Biotic Pawjectiles to heal them. If necessary, disconnecting to heal an ally can save them.
- Purr is your only self-sustain, so try not to use it carelessly and avoid making risky plays when it's on cooldown.
- It's the only healing ability that can be used during Lifeline, so if your tethered target is getting too low, use it to save them.
- As the majority of the healing will come from the later end of the duration, try use the ability moments prior to your team taking significant damage to get the most of it.
- The target being grabbed can still attack you, so be careful who you target.
- The impact causes a knockdown and stun which can interrupt channeled abilities (such as
 Resurrect or
  Coalescence).
 - If you want to drop an enemy off the map, but end up getting a target who could get back out/the enemy has heroes who can save them, you can lower them into the kill zone rather than dropping them.
- If there are no ledges to drop opponents off, you can drag them into your team so they can finish them off. Alternatively, moving them away from the battle and further to their backlines can stall a fight.
- During Overtime, you can use this ability to force an opponent off the objective to help secure it.
Match-Ups and Team Synergy
Tank
| Hero | Match-Up | Team Synergy |
|---|---|---|
 D.Va |
EVEN -> WEAK MATCHUP | HIGH RISK
D.Va can quickly chase Jetpack Cat down with her
|
STRONG SYNERGY
When D.Va dives in, you can work alongside her to keep her healthy and finish off targets. Always try to match her pace, as getting left behind can be a death sentence.
When D.Va has her ultimate ready, you can carry her in and drag her |
 Domina |
WEAK MATCHUP | HIGH RISK
Domina can deal very high damage to you at decent range, especially if she chooses Extended Power. Getting close puts you at risk of being devastated by her Sonic Repulsors. Play out of her line of sight or behind teammates, or simply stay far enough out of her range.
|
TBA SYNERGY
Team synergy details with Domina are currently missing. You can help the Overwatch Wiki by adding them!
|
 Doomfist |
STRONG MATCHUP | LOW RISK
Jetpack Cat completely ignores Doomfist's standard brawling toolkit simply by existing. Doomfist relies entirely on grounded displacement to combo targets, meaning your permanent flight makes you effectively untouchable. You can freely chip down Doomfist with
You do need to be incredibly careful of one specific interaction: if Doomfist uses an Empowered Rocket Punch or catches you near the ground, he can stun you out of your flight. If you get stunned or knocked down, your jetpack shuts off and you will plummet to the floor, leaving you highly vulnerable to his follow-up Hand Cannon shots. |
EXCEPTIONAL SYNERGY
Like any dive tank, you make a fantastic pair with Doomfist. You can play safely in the air above his dives, providing constant healing from
Your absolute greatest strength in this synergy is |
 Hazard |
EVVEN MATCHUP | HIGH RISK
Matchup details for Hazard are currently missing. You can help the Overwatch Wiki by adding them!
|
TBA SYNERGY
Team synergy details with Hazard are currently missing. You can help the Overwatch Wiki by adding them!
|
 Junker Queen |
EVEN -> STRONG MATCHUP | MEDIUM RISK
Junker Queen's Scattergun can do surprisingly decent damage even at range, so don't think she's helpless against you. Getting hit by
|
SITUATIONAL SYNERGY
Team synergy details with Junker Queen are currently missing. You can help the Overwatch Wiki by adding them!
|
 Mauga |
VERY WEAK MATCHUP | EXTREME RISK
Mauga can run right out of
|
TBA SYNERGY
Team synergy details with Mauga are currently missing. You can help the Overwatch Wiki by adding them!
|
 Orisa |
EVEN MATCHUP | MEDIUM RISK
You can use
|
GOOD SYNERGY
You can enable a friendly Orisa to push in without using her cooldowns by pulling her, allowing her to engage much more aggressively. You can also use Lifeline after she ultimates to pull her right into the enemy team and drop a full damage
|
 Ramattra |
EVEN -> WEAK MATCHUP | HIGH RISK
Ramattra can pull you directly out of the sky with
|
TBA SYNERGY
Team synergy details with Ramattra are currently missing. You can help the Overwatch Wiki by adding them!
|
 Reinhardt |
STRONG MATCHUP | LOW RISK
Reinhardt has very few ways to damage you as long as you play smart, so you can mostly play around him or even pester him with damage from above when it's safe. Don't use
|
EXCEPTIONAL SYNERGY
You can tether Reinhardt and let him swing wildly while moving much faster than the enemy would ever expect. Keep an eye on his HP and be sure to pull out if it gets too risky.
|
 Roadhog |
VERY WEAK MATCHUP | EXTREME RISK
Roadhog can and will instantly kill you if he can land his
|
TBA SYNERGY
Team synergy details with Roadhog are currently missing. You can help the Overwatch Wiki by adding them!
|
 Sigma |
EVEN MATCHUP | HIGH RISK
Matchup details for Sigma are currently missing. You can help the Overwatch Wiki by adding them!
|
TBA SYNERGY
Team synergy details with Sigma are currently missing. You can help the Overwatch Wiki by adding them!
|
 Winston |
EVEN -> WEAK MATCHUP | HIGH RISK
Winston can completely nullify your natural evasion and high mobility and can be a huge nuisance for Jetpack Cat to play around. Try to bait his
|
EXCEPTIONAL SYNERGY
Winston is arguably Jetpack Cat's best companion, as you can help support him in his dives while his
|
 Wrecking Ball |
EVEN MATCHUP | LOW RISK
You and Wrecking Ball match each other's mobility, so you can usually keep on top of him. When he tries to attack your backline, you can quickly go to them and help them deal with his attack.
|
STRONG SYNERGY
You can play alongside Wrecking Ball and help him dive, letting him be even more aggressive than normal, as with most dive tanks.
|
 Zarya |
EVEN MATCHUP | LOW RISK
Matchup details for Zarya are currently missing. You can help the Overwatch Wiki by adding them!
|
STRONG SYNERGY
Zarya's bubbles can be invaluable to Jetpack Cat in letting her be far more aggressive, so if you are properly communicating, you can be very effective together. Since Zarya has such limited mobility, your
|
Damage
| Hero | Match-Up | Team Synergy |
|---|---|---|
 Anran |
MEDIUM -> HIGH PRIORITY TARGET | MEDIUM RISK
Treat Anran like Genji; wait for her approach and help your team sustain and damage her when she dives the team. Stay higher against her to prevent her hitting you with her short-range fan, and she won't have many ways to stop you.
|
STRONG SYNERGY
Anran often leaves enemies she dives limping, so helping her secure kills can be very effective. Playing close to her can be very devastating.
|
 Ashe |
HIGH PRIORITY TARGET | EXTREME RISK
A good Ashe can make Jetpack Cat's life hell as she can very quickly kill her in the air, can chunk her with
|
GOOD SYNERGY
You can pick up a friendly B.O.B with
|
 Bastion |
MEDIUM PRIORITY TARGET | EXTREME RISK
Keep an eye on
|
SITUATIONAL SYNERGY
Flying around an Assault mode Bastion can be effective if used correctly. This becomes particularly effective if Bastion takes Lindholm Explosives as his major perk to rain down rockets from above.
|
 Cassidy |
HIGH PRIORITY TARGET | HIGH RISK
Don't approach Cassidy, as
|
STRONG SYNERGY
Affectionately referred to as "Higher Noon," using
|
 Echo |
MEDIUM PRIORITY TARGET | HIGH RISK
Echo is able to fly up and kill you very quickly if she is enabled to, so always try to play away from her. Conversely, her low HP means you can kill her very quickly too, particularly with the Claws Out perk. Always play cautiously and catch her off-guard if you are attacking.
|
TBA SYNERGY
Team synergy details with Echo are currently missing. You can help the Overwatch Wiki by adding them!
|
 Emre |
HIGH PRIORITY TARGET | HIGH RISK
Like any hitscan, Emre can put Jetpack Cat down in seconds. With his sustain and high damage, you should respect his sightlines as long as he is around.
|
TBA SYNERGY
Team synergy details with Emre are currently missing. You can help the Overwatch Wiki by adding them!
|
 Freja |
MEDIUM PRIORITY TARGET | MEDIUM RISK
Matchup details for Freja are currently missing. You can help the Overwatch Wiki by adding them!
|
TBA SYNERGY
Team synergy details with Freja are currently missing. You can help the Overwatch Wiki by adding them!
|
 Genji |
LOW PRIORITY TARGET | MEDIUM RISK
Pay attention to the enemy Genji and stay on top of him when he dives your team. Heal anyone he is trying to burst down and force him to retreat with your own damage. When he uses
|
TBA SYNERGY
Team synergy details with Genji are currently missing. You can help the Overwatch Wiki by adding them!
|
 Hanzo |
MEDIUM -> HIGH PRIORITY TARGET | HIGH RISK
Hanzo can take you out of the air and at close range quite easily, so be careful around his line of sight. Unlike Widowmaker, flanking him is risky as he can kill you before you can take him out, so wait till his cooldowns are up or he is fully distracted.
|
SITUATIONAL SYNERGY
You can use
|
 Junkrat |
LOW PRIORITY TARGET | LOW RISK
Junkrat cannot do much to you if you are playing right, and he struggles to defend against you without his major perks, so you are mostly free to pester him from above, especially if he has already used up his
|
TBA SYNERGY
Team synergy details with Junkrat are currently missing. You can help the Overwatch Wiki by adding them!
|
 Mei |
LOW PRIORITY TARGET | HIGH RISK
Mei can kill you very quickly if she can land her alt-fire icicles, but it's incredibly difficult to land on you in the air, so stay mobile. Diving anyone with her around is risky, as her slow can make it impossible to retreat. If you hear her ultimate, get
|
TBA SYNERGY
Team synergy details with Mei are currently missing. You can help the Overwatch Wiki by adding them!
|
 Pharah |
MEDIUM PRIORITY TARGET | MEDIUM RISK
You are one of the few heroes able to effectively match and duel Pharah in the air, and your projectiles are a lot easier to land than her rockets, so if it's safe you can fairly safely take her on in mid-air. She can very quickly destroy you if she can land her direct rockets, so play very evasively.
|
STRONG SYNERGY |
 Reaper |
LOW PRIORITY TARGET | LOW RISK
Reaper's short range means he won't be able to touch you in mid-air, but you also can't realistically get through his 300hp and sustain, so you are both at a complete impasse. Instead, ping him when he tries to flank and help keep your other teammates safe from him. If he retreats with
|
STRONG SYNERGY
You can assist a Reaper on the flank very easily, especially by keeping the enemy distracted from above while your Reaper ravages them. You can tether a
|
Shion |
TBA MATCHUP OR PRIORITY | TBA RISK
Matchup details for Shion are currently missing. You can help the Overwatch Wiki by adding them!
|
TBA SYNERGY
Team synergy details with Shion are currently missing. You can help the Overwatch Wiki by adding them!
|
 Sierra |
EXTREMELY HIGH PRIORITY TARGET | EXTREME RISK
Matchup details for Sierra are currently missing. You can help the Overwatch Wiki by adding them!
|
TBA SYNERGY
Team synergy details with Sierra are currently missing. You can help the Overwatch Wiki by adding them!
|
 Sojourn |
HIGH PRIORITY TARGET | EXTREME RISK
The same thing that applies to any hitscan applies here: respect her lines of sight and use flank routes if you need to approach her. She has fewer options at close range, so if she isn't charged and is exposed, it's fairly safe to dive her. Do not stay airborne if she is charged up, as she can instantly pop you out of the sky with her
|
TBA SYNERGY
Team synergy details with Sojourn are currently missing. You can help the Overwatch Wiki by adding them!
|
 Soldier: 76 |
HIGH PRIORITY TARGET | HIGH RISK
Soldier is a particularly annoying hitscan as not only can he take you down quickly, his healing makes it difficult to dive him, and
|
GOOD SYNERGY
|
 Sombra |
EXTREMELY HIGH PRIORITY TARGET | EXTREME RISK
Sombra is a hard counter to you. Getting
|
TBA SYNERGY
Team synergy details with Sombra are currently missing. You can help the Overwatch Wiki by adding them!
|
 Symmetra |
MEDIUM PRIORITY TARGET | MEDIUM RISK
Symmetra's
|
TBA SYNERGY
Team synergy details with Symmetra are currently missing. You can help the Overwatch Wiki by adding them!
|
 Torbjörn |
HIGH PRIORITY TARGET | MEDIUM RISK
Torbjörn's
|
SITUATIONAL SYNERGY
If there's no nearby death pit, you can use
|
 Tracer |
LOW PRIORITY TARGET | MEDIUM RISK
Tracer can be dangerous to play around as she can burst you down very fast. However, you are able to chase her retreat very effectively, especially with the Claws Out perk active. If you have this perk, you can usually be more aggressive against her.
|
TBA SYNERGY
Team synergy details with Tracer are currently missing. You can help the Overwatch Wiki by adding them!
|
 Vendetta |
MEDIUM PRIORITY TARGET | HIGH RISK
Don't assume Vendetta can't reach you as she has very high aerial mobility and can drag you down to your death very quickly. She can't do much to you otherwise, however, so you are able to stay mostly safe in the sky. When she tries to block to retreat, you can use your mobility to rush behind her and burst her down.
|
TBA SYNERGY
Team synergy details with Vendetta are currently missing. You can help the Overwatch Wiki by adding them!
|
 Venture |
LOW PRIORITY TARGET | LOW RISK
Most of what applies to Reaper applies to Venture. Because of your flight, you cannot do much to each other, so wait until they dive your teammates, then help push them back.
|
TBA SYNERGY
Team synergy details with Venture are currently missing. You can help the Overwatch Wiki by adding them!
|
 Widowmaker |
EXTREMELY HIGH PRIORITY TARGET | EXTREME RISK
Against a Widowmaker, you should always avoid her sightlines or stay unpredictable and on the move. Once you have her located, use flank routes to stay out of her line of sight and dive her; she cannot outdamage your sustain unless she is able to land a headshot at close range, and you can easily chase her
|
SITUATIONAL SYNERGY
You can tether a friendly Widowmaker and let her snipe from the sky, having her scope in from odd places, but this makes it very difficult to aim for her and leaves you entirely idle. In general, you should only do this with proper communication.
|
Support
| Hero | Match-Up | Team Synergy |
|---|---|---|
 Ana |
HIGH PRIORITY TARGET | HIGH RISK
Ana can take you out of the sky very quickly if you stay in her sightline, so stay behind cover. If she's away from her team, you can dive her from directly above to make it difficult for her to hit you with
|
EXCEPTIONAL SYNERGY
You and Ana make a great support comp, as you can provide constant small heals to divers and the team while Ana covers the tank and large damage. If and when Ana is dived, you can very quickly boost to her and help her out, while she can help protect you from other fliers.
|
 Baptiste |
HIGH PRIORITY TARGET | HIGH RISK
Baptiste should be approached like most hitscans, as he can deal heavy damage to you. He's also difficult to dive due to his
|
GOOD SYNERGY
Baptiste cannot effectively heal you in the air, so when playing with him you should keep that in mind. Baptiste's healing is great alongside yours for the team, so as long as you can sustain yourself, this is a great comp.
|
 Brigitte |
LOW PRIORITY TARGET | LOW RISK
Brigitte can do almost nothing to you in the air, but diving her is a death sentence. You can shoot her outside her range, but she can sustain against it long enough for her team to kill you. In general, unless she's low or away from her team, you should mostly ignore Brigitte.
|
STRONG SYNERGY
Brigitte and Jetpack Cat cover each other well, as she can stick with the team on the ground while you stay in the air and provide burst heals. This does provide a role reversal for Brigitte as she cannot defend you, and instead you'll be diving to help her in most cases.
|
 Illari |
HIGH PRIORITY TARGET | HIGH RISK
Illari is effectively the same as Ana in that she can take you out of the air quickly, so play around her sightlines. You are extremely effective at destroying her
|
STRONG SYNERGY
Illari's
|
 Jetpack Cat |
MIRROR MATCHUP | MEDIUM RISK
A mirror match between two Jetpack Cats takes place entirely in the skybox and usually comes down to who has better resource management. Diving a full-health enemy Cat will usually just result in her boosting away with
Always keep track of the enemy Cat's position, as she can easily flank you from the skybox. If the enemy Jetpack Cat uses her ultimate on one of your allies, use |
MIRROR SYNERGY
In game modes with no role limits, a double Jetpack Cat backline provides unparalleled aerial superiority. Because you are both in constant flight, standard flankers and brawlers will find it virtually impossible to eliminate the support line. You can cover massive amounts of the map, utilizing
|
 Juno |
MEDIUM PRIORITY TARGET | MEDIUM RISK
Juno's
|
EXCEPTIONAL SYNERGY
Juno's
|
 Kiriko |
MEDIUM PRIORITY TARGET | MEDIUM RISK
If you can catch Kiriko after she uses
|
GOOD SYNERGY
Kiriko and Jetpack Cat are a very effective dive comp if your team is playing around it, since you can both play around each other very well. If Kiriko goes down, quickly fly back to let her teleport to you from spawn, then grapple her the rest of the way.
|
 Lifeweaver |
MEDIUM PRIORITY TARGET | LOW RISK | STRONG SYNERGY
If Lifeweaver is playing well, he can let you be far more aggressive, as if things go wrong he can pull you out of the sky. You both have great single-target healing, and both can easily heal divers, so this support comp can be quite decent.
|
 Lúcio |
HIGH PRIORITY TARGET | LOW RISK
You are one of the few characters able to keep up with Lúcio's wall-riding, and he has no means to quickly disengage from you in the air, so you are very effective at dealing with him. Wait till he uses
|
SITUATIONAL SYNERGY
Both you and Lúcio have relatively low healing output, so you should be playing a more supportive/utility role with Lúcio. If and when Lúcio dives enemies, you can help dive as well, provided your team can sustain themselves without either support around.
|
 Mercy |
HIGH PRIORITY TARGET | LOW RISK
Mercy cannot defend herself against you in the air and you can chase her fairly freely, so she can be quite easy for you to burst down. Her self-sustain means if she is actively healing or in
|
GOOD SYNERGY
Mercy's relatively low healing output means you'll often have to play a more defensive role in this comp, but she can work very well with you since you provide a constant airborne target for her to
|
 Mizuki |
MEDIUM PRIORITY TARGET | EXTREME RISK
The moment Mizuki lands a
|
POOR SYNERGY
Mizuki requires his team to group up tightly inside his
|
 Moira |
HIGH PRIORITY TARGET | MEDIUM RISK
Moira can be an utter nuisance for you as her
|
STRONG SYNERGY
Moira's high healing output means you can be much more aggressive as she can handle your tank and grounded teammates. She can't effectively heal you in the sky, so play around health packs and your
|
 Wuyang |
MEDIUM PRIORITY TARGET | LOW RISK
Wuyang's attacks are weak unless he takes time to aim them,meaning he's not moving.
|
GOOD SYNERGY
You can drop an ally with a Wuyang ult onto the enemy team or can get it on you and dive the enemy.
|
 Zenyatta |
HIGH PRIORITY TARGET | EXTREME RISK
If Zenyatta hits you with
|
SITUATIONAL SYNERGY
Both Zenyatta and Jetpack Cat have limited healing that's restricted to single targets (outside of
|
Map Strategies
Control
| Map | Strategy & Stage Tips |
|---|---|
 Overall Strategy |
TBA RATING | TBA FEATURE
Map strategy details for Overall Strategy are currently missing. You can help the Overwatch Wiki by adding them!
|
 Antarctic Peninsula |
TBA RATING | TBA FEATURE
Map strategy details for Antarctic Peninsula are currently missing. You can help the Overwatch Wiki by adding them! Labs
Strategy details missing.
Sublevel
Strategy details missing.
Icebreaker
Strategy details missing.
|

|
TBA RATING | TBA FEATURE
Map strategy details for Busan are currently missing. You can help the Overwatch Wiki by adding them! Downtown
Strategy details missing.
Sanctuary
Strategy details missing.
MEKA Base
Strategy details missing.
|

|
TBA RATING | TBA FEATURE
Map strategy details for Ilios are currently missing. You can help the Overwatch Wiki by adding them! Lighthouse
Strategy details missing.
Well
Strategy details missing.
Ruins
Strategy details missing.
|

|
TBA RATING | TBA FEATURE
Map strategy details for Lijiang Tower are currently missing. You can help the Overwatch Wiki by adding them! Control Center
Strategy details missing.
Garden
Strategy details missing.
Night Market
Strategy details missing.
|

|
TBA RATING | TBA FEATURE
Map strategy details for Nepal are currently missing. You can help the Overwatch Wiki by adding them! Village
Strategy details missing.
Shrine
Strategy details missing.
Sanctum
Strategy details missing.
|

|
TBA RATING | TBA FEATURE
Map strategy details for Oasis are currently missing. You can help the Overwatch Wiki by adding them! City Center
Strategy details missing.
Gardens
Strategy details missing.
University
Strategy details missing.
|

|
TBA RATING | TBA FEATURE
Map strategy details for Samoa are currently missing. You can help the Overwatch Wiki by adding them! Beach
Strategy details missing.
Downtown
Strategy details missing.
Volcano
Strategy details missing.
|
Escort
| Map | Strategy & Stage Tips |
|---|---|
 Overall Strategy |
TBA RATING | TBA FEATURE
Map strategy details for Overall Strategy are currently missing. You can help the Overwatch Wiki by adding them!
|

|
TBA RATING | TBA FEATURE
Map strategy details for Circuit Royal are currently missing. You can help the Overwatch Wiki by adding them! Attack
Strategy details missing.
Defense
Strategy details missing.
|

|
TBA RATING | TBA FEATURE
Map strategy details for Dorado are currently missing. You can help the Overwatch Wiki by adding them! Attack
Strategy details missing.
Defense
Strategy details missing.
|

|
TBA RATING | TBA FEATURE
Map strategy details for Havana are currently missing. You can help the Overwatch Wiki by adding them! Attack
Strategy details missing.
Defense
Strategy details missing.
|

|
TBA RATING | TBA FEATURE
Map strategy details for Junkertown are currently missing. You can help the Overwatch Wiki by adding them! Attack
Strategy details missing.
Defense
Strategy details missing.
|

|
TBA RATING | TBA FEATURE
Map strategy details for Rialto are currently missing. You can help the Overwatch Wiki by adding them! Attack
Strategy details missing.
Defense
Strategy details missing.
|

|
TBA RATING | TBA FEATURE
Map strategy details for Route 66 are currently missing. You can help the Overwatch Wiki by adding them! Attack
Strategy details missing.
Defense
Strategy details missing.
|

|
TBA RATING | TBA FEATURE
Map strategy details for Shambali Monastery are currently missing. You can help the Overwatch Wiki by adding them! Attack
Strategy details missing.
Defense
Strategy details missing.
|

|
TBA RATING | TBA FEATURE
Map strategy details for Watchpoint: Gibraltar are currently missing. You can help the Overwatch Wiki by adding them! Attack
Strategy details missing.
Defense
Strategy details missing.
|
Hybrid
| Map | Strategy & Stage Tips |
|---|---|
 Overall Strategy |
TBA RATING | TBA FEATURE
Map strategy details for Overall Strategy are currently missing. You can help the Overwatch Wiki by adding them!
|
 Blizzard World |
TBA RATING | TBA FEATURE
Map strategy details for Blizzard World are currently missing. You can help the Overwatch Wiki by adding them! Attack
Strategy details missing.
Defense
Strategy details missing.
|

|
TBA RATING | TBA FEATURE
Map strategy details for Eichenwalde are currently missing. You can help the Overwatch Wiki by adding them! Attack
Strategy details missing.
Defense
Strategy details missing.
|

|
TBA RATING | TBA FEATURE
Map strategy details for Hollywood are currently missing. You can help the Overwatch Wiki by adding them! Attack
Strategy details missing.
Defense
Strategy details missing.
|

|
TBA RATING | TBA FEATURE
Map strategy details for King's Row are currently missing. You can help the Overwatch Wiki by adding them! Attack
Strategy details missing.
Defense
Strategy details missing.
|

|
TBA RATING | TBA FEATURE
Map strategy details for Midtown are currently missing. You can help the Overwatch Wiki by adding them! Attack
Strategy details missing.
Defense
Strategy details missing.
|
 Numbani |
TBA RATING | TBA FEATURE
Map strategy details for Numbani are currently missing. You can help the Overwatch Wiki by adding them! Attack
Strategy details missing.
Defense
Strategy details missing.
|

|
TBA RATING | TBA FEATURE
Map strategy details for Paraíso are currently missing. You can help the Overwatch Wiki by adding them! Attack
Strategy details missing.
Defense
Strategy details missing.
|
Push
| Map | Strategy & Stage Tips |
|---|---|
 Overall Strategy |
TBA RATING | TBA FEATURE
Map strategy details for Overall Strategy are currently missing. You can help the Overwatch Wiki by adding them!
|

|
TBA RATING | TBA FEATURE
Map strategy details for Colosseo are currently missing. You can help the Overwatch Wiki by adding them! Pushing
Strategy details missing.
Defending
Strategy details missing.
|

|
TBA RATING | TBA FEATURE
Map strategy details for Esperança are currently missing. You can help the Overwatch Wiki by adding them! Pushing
Strategy details missing.
Defending
Strategy details missing.
|

|
TBA RATING | TBA FEATURE
Map strategy details for New Queen Street are currently missing. You can help the Overwatch Wiki by adding them! Pushing
Strategy details missing.
Defending
Strategy details missing.
|

|
TBA RATING | TBA FEATURE
Map strategy details for Runasapi are currently missing. You can help the Overwatch Wiki by adding them! Pushing
Strategy details missing.
Defending
Strategy details missing.
|
Flashpoint
| Map | Strategy & Stage Tips |
|---|---|
 Overall Strategy |
TBA RATING | TBA FEATURE
Map strategy details for Overall Strategy are currently missing. You can help the Overwatch Wiki by adding them!
|

|
TBA RATING | TBA FEATURE
Map strategy details for Aatlis are currently missing. You can help the Overwatch Wiki by adding them! Station
Strategy details missing.
Garden
Strategy details missing.
Town Center
Strategy details missing.
Bazaar
Strategy details missing.
Resort
Strategy details missing.
|

|
TBA RATING | TBA FEATURE
Map strategy details for New Junk City are currently missing. You can help the Overwatch Wiki by adding them! Arena
Strategy details missing.
The Ducts
Strategy details missing.
Refinery
Strategy details missing.
Junkyard
Strategy details missing.
Bomb Flats
Strategy details missing.
|

|
TBA RATING | TBA FEATURE
Map strategy details for Suravasa are currently missing. You can help the Overwatch Wiki by adding them! Market
Strategy details missing.
Garden
Strategy details missing.
Palace
Strategy details missing.
Temple
Strategy details missing.
Ruins
Strategy details missing.
|
Hero Challenges
| Name | Icon | Description | Reward |
|---|---|---|---|
|
|
Get 3 Environmental kills in Quick or Competitive Play. |  | |
|
|
Heal a carried ally with a single use of Lifeline for 500 health in Quick or Competitive Play. |  |
Trivia
- Blizzard has stated that Jetpack Cat’s backstory is intentionally minimal at introduction, with narrative details revealed gradually through gameplay elements such as animations, sounds, and interactions rather than direct exposition. In official announcements, developers explained their approach to her storytelling:
"You will see as you play the game, or hear the things that the cat does, that might reveal a little bit more about the cat. We'll see a journey [and] why the cat exists in the world."
- The name Fika is a Swedish untranslatable word derived from Swedish coffee culture, where coffee and pastries are consumed in a social setting.
- Fika is the first fully airborne support hero in Overwatch.
- She is the third animal hero added to the game.
- Jetpack Cat cannot equip universal emotes.
- Jetpack Cat is voiced by Jennifer Hale, the same voice actor for Ashe.

- She was originally a stray cat from Gibraltar before being adopted by Brigitte Lindholm.
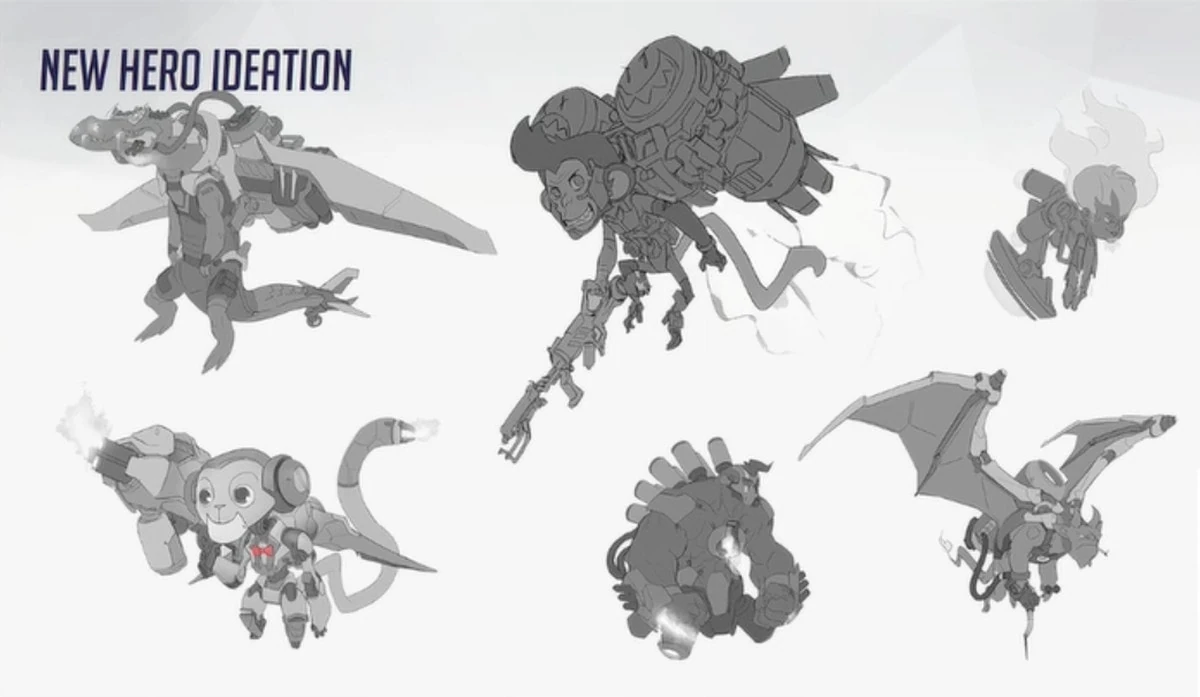
Development
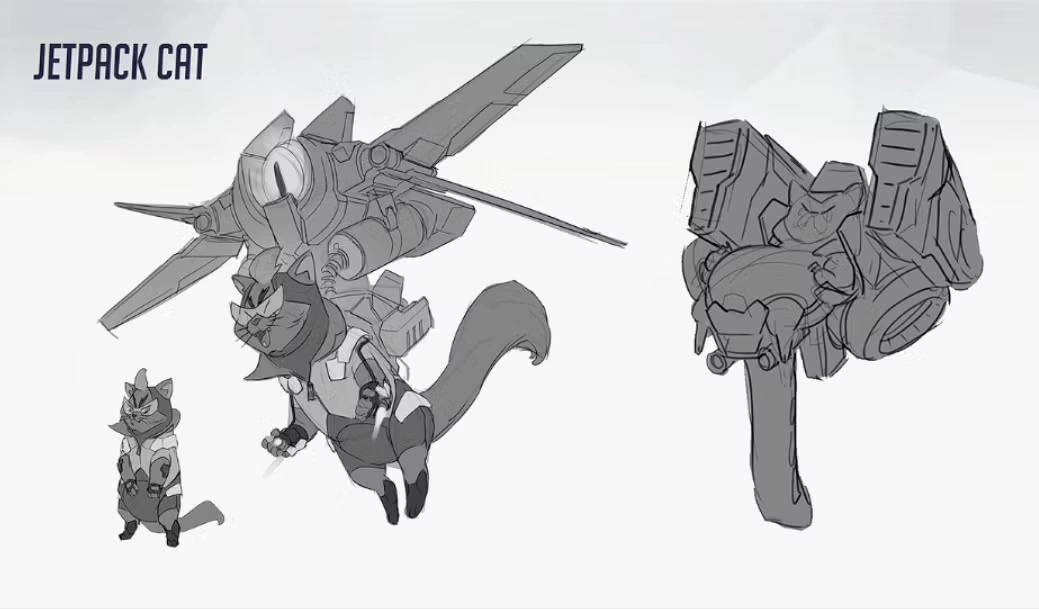
Early concept arts of scrapped version of Jetpack Cat
The term "Jetpack Cat"[5] started as an off-hand name used to describe a canceled hero from the original Overwatch. The original concept was a cat in a jetpack, controlling it with its paws, but it was considered going too far and was scrapped. According to Jeff Kaplan, he couldn't even imagine it in first-person, referring to his own cat's tendencies to knock things off the desk or otherwise be a nuisance.[6]
Kaplan mentioned "Jetpack Cat" in April 2017. Michael Chu later commented on Reddit that Torbjörn’s cats inspired ideas for animal companions in the game.[5]
Jetpack Cat was officially revealed as a hero in Season 1: Conquest.[7]
Removed Abilities
Removed Perks

- It damages for 33% of the healing it would do, regardless of whether allies or Jetpack Cat is at full health.
- Removed in Mid-Season 1 (2026).
Images
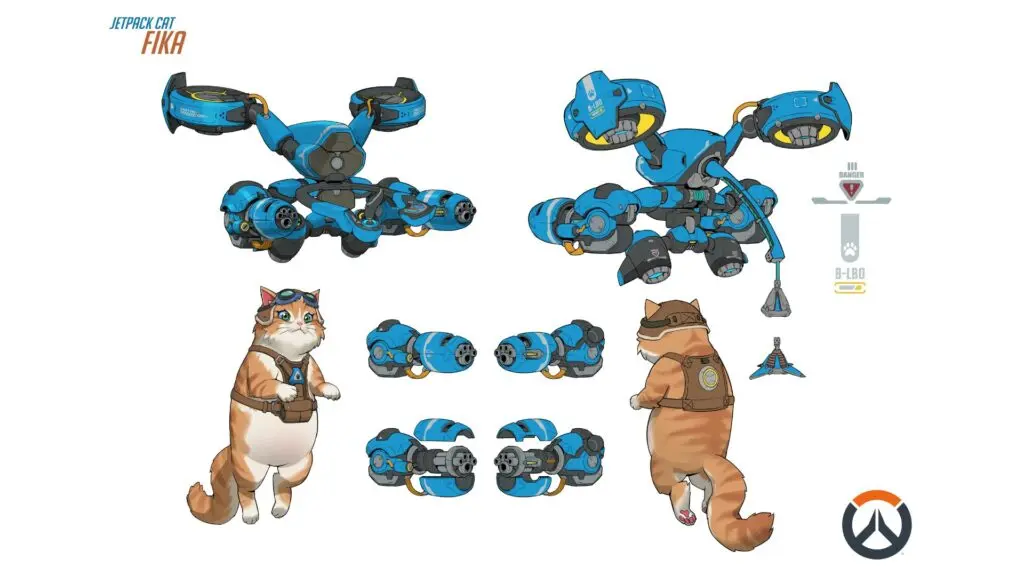
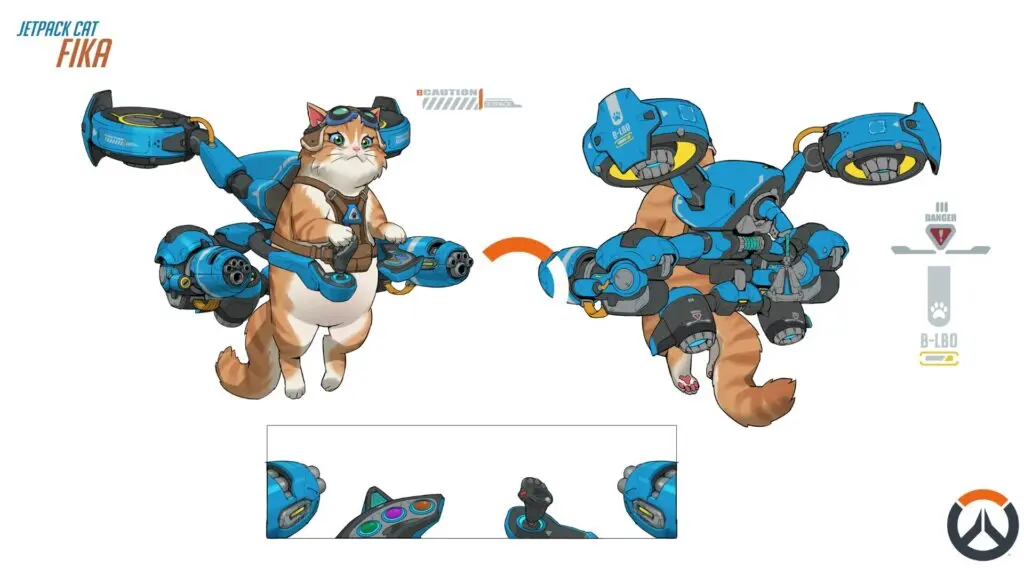
-
 Concept art (Fika)
 -
 Additional concept art
 -
![Older version model and default animation of Jetpack Cat[8]](/_images?url=https%3A%2F%2Fstatic.wikia.nocookie.net%2Foverwatch_gamepedia%2Fimages%2F9%2F93%2FOld_jetpack_cat.png%2Frevision%2Flatest%2Fscale-to-width-down%2F118%3Fcb%3D20260301220006) Older version model and default animation of Jetpack Cat[8]
Older version model and default animation of Jetpack Cat[8]
![Older version model and default animation of Jetpack Cat[8]](https://static.wikia.nocookie.net/overwatch_gamepedia/images/9/93/Old_jetpack_cat.png/revision/latest?cb=20260301220006)
Balance Change Log
- For more information, see Patch Notes.
- Acceleration reduced by 11%.
![]() Claws Out – Major Perk
Claws Out – Major Perk
- Cooldown reductions now apply to the Claws Out cooldown.
- Now generates 25% fuel on knockback. (undocumented)
![]() Territorial – Major Perk
Territorial – Major Perk
- Removed
![]() Claws Out – Major Perk
Claws Out – Major Perk
- Moved from Minor to Major.
- Cooldown reduced from 8 to 6 seconds.
![]() Ulterior Motive – Minor Perk
Ulterior Motive – Minor Perk
- New
- 15% of Biotic Pawjectiles healing is converted into fuel.
![]() Claws Out – Minor Perk
Claws Out – Minor Perk
- Cooldown increased from 6 to 8 seconds.
![]() Territorial – Major Perk
Territorial – Major Perk
- Damage dealt reduced from 50% to 33%.
- Regeneration rate reduced from 30 to 25.
- Hero Updates
General
- Roster Updates
- Jetpack Cat has been added to the Support roster
References
- ↑ https://www.reddit.com/r/overwatch2/comments/1rf4ipi/comment/o7hespl/
- ↑ https://www.reddit.com/r/overwatch2/comments/1rf4ipi/comment/o7hq4ce/
- ↑ https://www.reddit.com/r/JetpackCatMainsOW/s/Iko6cuo0mS
- ↑ https://www.youtube.com/watch?v=tXvDdHpd3BQ
- ↑ 5.0 5.1 2017-05-16, Overwatch Lore – Michael Chu Reddit A.M.A Summary! | Hammeh. YouTube, accessed 2017-05-18
- ↑ 2017-04-04, Overwatch Director Talks Abandoned Cat Hero. GameSpot, accessed 2017-05-18
- ↑ 2026-02-04, Jetpack Cat (and 4 more Heroes) joins the Overwatch lineup February 10. Blizzard Watch, accessed 2026-02-05
- ↑ 2026-02-04 Overwatch 2026 Spotlight | New Heroes, Cosmetics, Gameplay Updates, & More
| Heroes in Overwatch
| ||||||||
|---|---|---|---|---|---|---|---|---|
Tank |
 Bruiser |
|||||||
 Initiator |
||||||||
 Stalwart |
||||||||
Damage |
 Flanker |
|||||||
 Recon |
||||||||
 Sharpshooter |
||||||||
 Specialist |
||||||||
Support |
 Medic |
|||||||
 Survivor |
||||||||
Tactician |
 Jetpack Cat |
|||||||


