Anran is a Flanker Damage hero in Overwatch. She was one of the five heroes released in Season 1: Conquest on 10 February 2026, making her the 46th hero to be added to the game.
Overview
As a star student of Wuxing University's Fire College, Anran controls Fire to burn away enemies in her path. Her high mobility and consistent damage provide her with the tools to easily disrupt the enemy's backline, picking out weak targets to assassinate. Her Ignition passive makes her a deadly threat to go against, with her Zhuque Fans allowing her to thrive on burning targets.
-
 3D Portrait
 -
 2D Portrait
Abilities
Passive Abilities


- Small Health packs restore 150 Hit points, up from 75.
- Large Health packs restore 325 Hit points, up from 250.
- Anran, Genji, and Tracer additionally have a higher base movement speed of 6.0m/s, rather than the normal 5.5m/s.

20 per second (fan the flames)
- Upon accumulating 100% ignition on a target, they will be ignited.
- Ignition less than 100% resets to 0% after 4 seconds if not increased by igniting attacks..
- Affects Deployables, such as turrets or
 Tree of Life, but not Barriers.
Weapons


44 (per volley)
- Damage per second: 66 while firing (53.88 w/ reload) (while not burning)
- Damage per second: 76 while firing (63.88 w/ reload) (while burning)
- 25% ignition per shot hit, 17% on tanks.
- Takes 4 hits (2 volleys) to trigger ignition, 6 hits (3 volleys) for tanks.
- Ignition % gained is affected by headshots.

36 (base)
72 (burning)
- Damage per second: 54 while firing (44.06 w/ reload) (while not burning)
- Damage per second: 128 while firing (108.13 w/ reload) (while burning)
- 25% ignition per shot hit, 17% on tanks.
- Takes 4 hits (4 volleys) to trigger ignition, 6 hits (6 volleys) for tanks.
- Amplifies burning damage from 10 to 20 damage per second, for 2 seconds.
- If Ignition is triggered by Fan the Flames, the critical burning affect is still applied.
- Unlike other beam weapons, this weapon can be amplified by
 Amplification Matrix.
Special Abilities

2 charges
- Anran can automatically climb over small ledges.
- Anran has 20% increased Jump height.
- 50% ignition on enemies hit, 33% on tanks.
- Can provide an initial vertical boost if the ability is activated while looking up.
- The ability makes the player to go in the direction they are facing.
- Using the ability locks them out of moving left or right, forcing them to go forward.
- Can be canceled early by pressing Quick Melee.

25 (subsequent targets)
- Healing is not reduced by the global healing reduction passive.
- Movement range of 2.25 meters.
- 50% ignition on enemies hit, 33% on tanks.
Ultimate Ability

13 m/s (launch)
0.8 m/s (ascent)
10.8 m/s (max)
- Targets hit receive 100% ignition.
- Targets hit are knocked towards the point of impact.
- The radius is spherical from the point of impact.
- If targeted at a player, the landing zone will automatically be set below the player (when launched).
- If targeting an area out of range, Anran will travel the furthest distance possible, then explode.

55 - 30 (area of effect)
2.3 seconds (explosion)
0.7 seconds (explosion animation)
- There is a 0.048 second delay before Anran can start shooting again.
- Targets hit receive 100% ignition.
- Can be cast up to 5 seconds after death.
- Unlike Vermillion Ascent, this ultimate does not pierce barriers but does ignore Armor's damage reduction.
- Can be targeted by
 Nano Boost,
  Caduceus Staff,
  Tidal Blast and
  Orb of Harmony.
 - Benefits from
 Sound Barrier during revival.
 - If Anran dies with Vermillion Revival available, both allies and enemies will see a flame above her corpse, indicating that Anran can use it.
 Resurrect cannot be used on Anran while reviving with Vermillion Revival and vice versa. Whichever was activated first will have priority.
Perks
Minor Perks
A Minor Perk can be chosen at level 2.

- Increases duration of burning triggered by Ignition to 4.5 seconds.
- Does not increase the duration of critical burning from Fan the Flames.

- Overhealth decays 4 seconds after hitting the ground/becoming actionable.
- Works with either Ultimate.
Major perks
A Major Perk can be chosen at level 3.

- Impacting multiple enemies will reduce the cooldown by 1.5 per each hit.
- If all 5 enemies are hit, it will be reduced by 7.5 seconds (for a 1 second cooldown).

- Can fully heal back to 250 HP if 5 targets are hit.
- Healing is not reduced by the global healing reduction passive.
Strategy
- This section is a stub section. You can help by adding any available information to this section.
- General
Placeholder text.
 Ignition (Passive)
- Placeholder text.
- Placeholder text.
- Placeholder text.
- Placeholder text.
- Placeholder text.
- Placeholder text.
- Placeholder text.
Match-Ups and Team Synergy
Tank
| Hero | Match-Up | Team Synergy |
|---|---|---|
 D.Va |
TBA MATCHUP OR PRIORITY | TBA RISK
Matchup details for D.Va are currently missing. You can help the Overwatch Wiki by adding them!
|
TBA SYNERGY
Team synergy details with D.Va are currently missing. You can help the Overwatch Wiki by adding them!
|
 Domina |
TBA MATCHUP OR PRIORITY | TBA RISK
Matchup details for Domina are currently missing. You can help the Overwatch Wiki by adding them!
|
TBA SYNERGY
Team synergy details with Domina are currently missing. You can help the Overwatch Wiki by adding them!
|
 Doomfist |
TBA MATCHUP OR PRIORITY | TBA RISK
Matchup details for Doomfist are currently missing. You can help the Overwatch Wiki by adding them!
|
TBA SYNERGY
Team synergy details with Doomfist are currently missing. You can help the Overwatch Wiki by adding them!
|
 Hazard |
TBA MATCHUP OR PRIORITY | TBA RISK
Matchup details for Hazard are currently missing. You can help the Overwatch Wiki by adding them!
|
TBA SYNERGY
Team synergy details with Hazard are currently missing. You can help the Overwatch Wiki by adding them!
|
 Junker Queen |
TBA MATCHUP OR PRIORITY | TBA RISK
Matchup details for Junker Queen are currently missing. You can help the Overwatch Wiki by adding them!
|
TBA SYNERGY
Team synergy details with Junker Queen are currently missing. You can help the Overwatch Wiki by adding them!
|
 Mauga |
TBA MATCHUP OR PRIORITY | TBA RISK
Matchup details for Mauga are currently missing. You can help the Overwatch Wiki by adding them!
|
TBA SYNERGY
Team synergy details with Mauga are currently missing. You can help the Overwatch Wiki by adding them!
|
 Orisa |
TBA MATCHUP OR PRIORITY | TBA RISK
Matchup details for Orisa are currently missing. You can help the Overwatch Wiki by adding them!
|
TBA SYNERGY
Team synergy details with Orisa are currently missing. You can help the Overwatch Wiki by adding them!
|
 Ramattra |
TBA MATCHUP OR PRIORITY | TBA RISK
Matchup details for Ramattra are currently missing. You can help the Overwatch Wiki by adding them!
|
TBA SYNERGY
Team synergy details with Ramattra are currently missing. You can help the Overwatch Wiki by adding them!
|
 Reinhardt |
TBA MATCHUP OR PRIORITY | TBA RISK
Matchup details for Reinhardt are currently missing. You can help the Overwatch Wiki by adding them!
|
TBA SYNERGY
Team synergy details with Reinhardt are currently missing. You can help the Overwatch Wiki by adding them!
|
 Roadhog |
TBA MATCHUP OR PRIORITY | TBA RISK
Matchup details for Roadhog are currently missing. You can help the Overwatch Wiki by adding them!
|
TBA SYNERGY
Team synergy details with Roadhog are currently missing. You can help the Overwatch Wiki by adding them!
|
 Sigma |
TBA MATCHUP OR PRIORITY | TBA RISK
Matchup details for Sigma are currently missing. You can help the Overwatch Wiki by adding them!
|
TBA SYNERGY
Team synergy details with Sigma are currently missing. You can help the Overwatch Wiki by adding them!
|
 Winston |
TBA MATCHUP OR PRIORITY | TBA RISK
Matchup details for Winston are currently missing. You can help the Overwatch Wiki by adding them!
|
TBA SYNERGY
Team synergy details with Winston are currently missing. You can help the Overwatch Wiki by adding them!
|
 Wrecking Ball |
TBA MATCHUP OR PRIORITY | TBA RISK
Matchup details for Wrecking Ball are currently missing. You can help the Overwatch Wiki by adding them!
|
TBA SYNERGY
Team synergy details with Wrecking Ball are currently missing. You can help the Overwatch Wiki by adding them!
|
 Zarya |
TBA MATCHUP OR PRIORITY | TBA RISK
Matchup details for Zarya are currently missing. You can help the Overwatch Wiki by adding them!
|
TBA SYNERGY
Team synergy details with Zarya are currently missing. You can help the Overwatch Wiki by adding them!
|
Damage
| Hero | Match-Up | Team Synergy |
|---|---|---|
 Anran |
MIRROR MATCHUP | TBA RISK
Matchup details for Anran are currently missing. You can help the Overwatch Wiki by adding them!
|
MIRROR SYNERGY
Team synergy details with Anran are currently missing. You can help the Overwatch Wiki by adding them!
|
 Ashe |
TBA MATCHUP OR PRIORITY | TBA RISK
Matchup details for Ashe are currently missing. You can help the Overwatch Wiki by adding them!
|
TBA SYNERGY
Team synergy details with Ashe are currently missing. You can help the Overwatch Wiki by adding them!
|
 Bastion |
TBA MATCHUP OR PRIORITY | TBA RISK
Matchup details for Bastion are currently missing. You can help the Overwatch Wiki by adding them!
|
TBA SYNERGY
Team synergy details with Bastion are currently missing. You can help the Overwatch Wiki by adding them!
|
 Cassidy |
TBA MATCHUP OR PRIORITY | TBA RISK
Matchup details for Cassidy are currently missing. You can help the Overwatch Wiki by adding them!
|
TBA SYNERGY
Team synergy details with Cassidy are currently missing. You can help the Overwatch Wiki by adding them!
|
 Echo |
TBA MATCHUP OR PRIORITY | TBA RISK
Matchup details for Echo are currently missing. You can help the Overwatch Wiki by adding them!
|
TBA SYNERGY
Team synergy details with Echo are currently missing. You can help the Overwatch Wiki by adding them!
|
 Emre |
TBA MATCHUP OR PRIORITY | TBA RISK
Matchup details for Emre are currently missing. You can help the Overwatch Wiki by adding them!
|
TBA SYNERGY
Team synergy details with Emre are currently missing. You can help the Overwatch Wiki by adding them!
|
 Freja |
TBA MATCHUP OR PRIORITY | TBA RISK
Matchup details for Freja are currently missing. You can help the Overwatch Wiki by adding them!
|
TBA SYNERGY
Team synergy details with Freja are currently missing. You can help the Overwatch Wiki by adding them!
|
 Genji |
TBA MATCHUP OR PRIORITY | TBA RISK
Matchup details for Genji are currently missing. You can help the Overwatch Wiki by adding them!
|
TBA SYNERGY
Team synergy details with Genji are currently missing. You can help the Overwatch Wiki by adding them!
|
 Hanzo |
TBA MATCHUP OR PRIORITY | TBA RISK
Matchup details for Hanzo are currently missing. You can help the Overwatch Wiki by adding them!
|
TBA SYNERGY
Team synergy details with Hanzo are currently missing. You can help the Overwatch Wiki by adding them!
|
 Junkrat |
TBA MATCHUP OR PRIORITY | TBA RISK
Matchup details for Junkrat are currently missing. You can help the Overwatch Wiki by adding them!
|
TBA SYNERGY
Team synergy details with Junkrat are currently missing. You can help the Overwatch Wiki by adding them!
|
 Mei |
TBA MATCHUP OR PRIORITY | TBA RISK
Matchup details for Mei are currently missing. You can help the Overwatch Wiki by adding them!
|
TBA SYNERGY
Team synergy details with Mei are currently missing. You can help the Overwatch Wiki by adding them!
|
 Pharah |
TBA MATCHUP OR PRIORITY | TBA RISK
Matchup details for Pharah are currently missing. You can help the Overwatch Wiki by adding them!
|
TBA SYNERGY
Team synergy details with Pharah are currently missing. You can help the Overwatch Wiki by adding them!
|
 Reaper |
TBA MATCHUP OR PRIORITY | TBA RISK
Matchup details for Reaper are currently missing. You can help the Overwatch Wiki by adding them!
|
TBA SYNERGY
Team synergy details with Reaper are currently missing. You can help the Overwatch Wiki by adding them!
|
Shion |
TBA MATCHUP OR PRIORITY | TBA RISK
Matchup details for Shion are currently missing. You can help the Overwatch Wiki by adding them!
|
TBA SYNERGY
Team synergy details with Shion are currently missing. You can help the Overwatch Wiki by adding them!
|
 Sierra |
TBA MATCHUP OR PRIORITY | TBA RISK
Matchup details for Sierra are currently missing. You can help the Overwatch Wiki by adding them!
|
TBA SYNERGY
Team synergy details with Sierra are currently missing. You can help the Overwatch Wiki by adding them!
|
 Sojourn |
TBA MATCHUP OR PRIORITY | TBA RISK
Matchup details for Sojourn are currently missing. You can help the Overwatch Wiki by adding them!
|
TBA SYNERGY
Team synergy details with Sojourn are currently missing. You can help the Overwatch Wiki by adding them!
|
 Soldier: 76 |
TBA MATCHUP OR PRIORITY | TBA RISK
Matchup details for Soldier: 76 are currently missing. You can help the Overwatch Wiki by adding them!
|
TBA SYNERGY
Team synergy details with Soldier: 76 are currently missing. You can help the Overwatch Wiki by adding them!
|
 Sombra |
TBA MATCHUP OR PRIORITY | TBA RISK
Matchup details for Sombra are currently missing. You can help the Overwatch Wiki by adding them!
|
TBA SYNERGY
Team synergy details with Sombra are currently missing. You can help the Overwatch Wiki by adding them!
|
 Symmetra |
TBA MATCHUP OR PRIORITY | TBA RISK
Matchup details for Symmetra are currently missing. You can help the Overwatch Wiki by adding them!
|
TBA SYNERGY
Team synergy details with Symmetra are currently missing. You can help the Overwatch Wiki by adding them!
|
 Torbjörn |
TBA MATCHUP OR PRIORITY | TBA RISK
Matchup details for Torbjörn are currently missing. You can help the Overwatch Wiki by adding them!
|
TBA SYNERGY
Team synergy details with Torbjörn are currently missing. You can help the Overwatch Wiki by adding them!
|
 Tracer |
TBA MATCHUP OR PRIORITY | TBA RISK
Matchup details for Tracer are currently missing. You can help the Overwatch Wiki by adding them!
|
TBA SYNERGY
Team synergy details with Tracer are currently missing. You can help the Overwatch Wiki by adding them!
|
 Vendetta |
TBA MATCHUP OR PRIORITY | TBA RISK
Matchup details for Vendetta are currently missing. You can help the Overwatch Wiki by adding them!
|
TBA SYNERGY
Team synergy details with Vendetta are currently missing. You can help the Overwatch Wiki by adding them!
|
 Venture |
TBA MATCHUP OR PRIORITY | TBA RISK
Matchup details for Venture are currently missing. You can help the Overwatch Wiki by adding them!
|
TBA SYNERGY
Team synergy details with Venture are currently missing. You can help the Overwatch Wiki by adding them!
|
 Widowmaker |
TBA MATCHUP OR PRIORITY | TBA RISK
Matchup details for Widowmaker are currently missing. You can help the Overwatch Wiki by adding them!
|
TBA SYNERGY
Team synergy details with Widowmaker are currently missing. You can help the Overwatch Wiki by adding them!
|
Support
| Hero | Match-Up | Team Synergy |
|---|---|---|
 Ana |
HIGH PRIORITY TARGET | MEDIUM RISK
Ana’s lack of mobility makes her a prime target for Anran’s flanking playstyle. Because Ana has a relatively large, static hitbox when aiming down sights, you can easily land consecutive
The primary threats are her If Ana lands an anti-heal grenade on you, your Flanker sub-role passive (amplifying health packs) is temporarily rendered useless. Use |
STRONG SYNERGY
Ana and Anran have strong synergy, though it requires precise coordination due to Anran’s tendency to operate deep behind enemy lines out of Ana's line of sight.
Where this duo truly shines is ultimate combinations. A |
 Baptiste |
MEDIUM PRIORITY TARGET | HIGH RISK
Baptiste is a highly frustrating support for Anran to assassinate. His
Furthermore, his |
SITUATIONAL SYNERGY
Baptiste and Anran do not share ideal positioning. Anran wants to flank and take aggressive off-angles, while Baptiste prefers his team to be tightly grouped to maximize his area-of-effect healing and
However, Baptiste’s Immortality Field can be thrown over walls to save Anran if she overextends, and shooting her |
 Brigitte |
LOW PRIORITY TARGET | HIGH RISK
Brigitte is one of Anran's hardest counters in the support roster. Brigitte's natural armor severely reduces the impact damage of your
If you attempt to engage with Because the |
WEAK SYNERGY
Brigitte and Anran have very little direct synergy. Brigitte operates as a backline protector (anti-dive), whereas Anran is a proactive diver. Brigitte’s
|
 Illari |
HIGH PRIORITY TARGET | MEDIUM RISK
Illari’s
Illari can use Because the |
GOOD SYNERGY
Illari’s Healing Pylon allows her to set up a safe zone that Anran can retreat to. Because Anran is a Flanker, she relies heavily on health packs, but having a well-placed Pylon on a high-ground flank route gives Anran an incredibly reliable anchor point to stage multiple dives from.
Anran is also fantastic at forcing the detonation of Illari's |
 Jetpack Cat |
LOW PRIORITY TARGET | HIGH RISK
Fika operates almost entirely in the skybox, making her an incredibly difficult target for Anran's projectile-based
If you are caught by her It is more beneficial to instead use |
SITUATIONAL SYNERGY
Anran and Jetpack Cat struggle to maintain synergy due to movement speeds and pathing. Jetpack Cat’s
However, if Fika lands her |
 Juno |
MEDIUM PRIORITY TARGET | LOW RISK
Juno’s extreme aerial mobility makes her slippery, but she lacks the burst damage to pose a lethal threat to Anran in a 1v1 duel. If you can track her trajectory during her
If she drops her Because the |
STRONG SYNERGY
Juno's
|
 Kiriko |
HIGH PRIORITY TARGET | EXTREME RISK
Kiriko is a massive threat to Anran’s entire kit. Her
Kiriko's kunai deal severe headshot damage, making her highly lethal if she catches you predictably utilizing |
EXCEPTIONAL SYNERGY
Kiriko is arguably Anran's best support partner. Her
When Kiriko casts |
 Lifeweaver |
HIGH PRIORITY TARGET | LOW RISK
Lifeweaver’s massive hitbox makes him the easiest support in the game for Anran to hit with her projectiles. You can consistently build 100%
If he attempts to escape using his Keep in mind that your |
EXCEPTIONAL SYNERGY
Lifeweaver provides the ultimate safety net for Anran. Because Anran frequently plays on a knife's edge, diving into the entire enemy team to secure a kill, Lifeweaver can use
Crucially, if Anran dies deep in enemy territory and casts |
 Lúcio |
LOW PRIORITY TARGET | LOW RISK
Lúcio’s
His |
STRONG SYNERGY
Lúcio and Anran thrive in fast-paced dive compositions. Lúcio’s speed boost makes Anran’s strafing highly erratic while she fires her
|
 Mercy |
HIGH PRIORITY TARGET | MEDIUM RISK
Mercy relies heavily on her
You must heavily track her |
STRONG SYNERGY
Mercy’s
There is a highly specific interaction between Anran and Mercy regarding death: if Anran dies with her ultimate ready, she has a 5-second window to cast |
 Mizuki |
MEDIUM PRIORITY TARGET | HIGH RISK
Mizuki’s
His ultimate, Because the |
GOOD SYNERGY
Mizuki can enable Anran through aggressive dives. His
Because Mizuki lacks vertical mobility, Anran must be careful not to engage on high ground where Mizuki cannot assist her. |
 Moira |
MEDIUM PRIORITY TARGET | MEDIUM RISK
Moira is a slippery target for Anran. Her
Do not engage Moira in enclosed spaces. Her |
GOOD SYNERGY
Moira and Anran form a highly aggressive pairing. Moira’s
|
 Wuyang |
HIGH PRIORITY TARGET | MEDIUM RISK
This sibling rivalry heavily favors Anran if she can close the gap. Wuyang relies on maintaining range with his steerable
Be highly aware of his If he casts Because the |
EXCEPTIONAL SYNERGY
The Ye siblings boast unparalleled synergy. Because Anran utilizes the Flanker sub-role passive, she frequently operates entirely independently. Wuyang can attach his passive
Furthermore, Anran is the perfect target for Wuyang’s |
 Zenyatta |
EXTREMELY HIGH PRIORITY TARGET | LOW RISK
Zenyatta is highly immobile and possesses a wide, square hitbox, making him the easiest target in the game for Anran to assassinate. You can easily land full volleys of your
While his His |
EXCEPTIONAL SYNERGY
Zenyatta provides exactly what Anran needs: extreme ranged lethality. His
The true power of this duo lies in his |
Map Strategies
Control
| Map | Strategy & Stage Tips |
|---|---|
 Overall Strategy |
TBA RATING | TBA FEATURE
Map strategy details for Overall Strategy are currently missing. You can help the Overwatch Wiki by adding them!
|
 Antarctic Peninsula |
TBA RATING | TBA FEATURE
Map strategy details for Antarctic Peninsula are currently missing. You can help the Overwatch Wiki by adding them! Labs
Strategy details missing.
Sublevel
Strategy details missing.
Icebreaker
Strategy details missing.
|

|
TBA RATING | TBA FEATURE
Map strategy details for Busan are currently missing. You can help the Overwatch Wiki by adding them! Downtown
Strategy details missing.
Sanctuary
Strategy details missing.
MEKA Base
Strategy details missing.
|

|
TBA RATING | TBA FEATURE
Map strategy details for Ilios are currently missing. You can help the Overwatch Wiki by adding them! Lighthouse
Strategy details missing.
Well
Strategy details missing.
Ruins
Strategy details missing.
|

|
TBA RATING | TBA FEATURE
Map strategy details for Lijiang Tower are currently missing. You can help the Overwatch Wiki by adding them! Control Center
Strategy details missing.
Garden
Strategy details missing.
Night Market
Strategy details missing.
|

|
TBA RATING | TBA FEATURE
Map strategy details for Nepal are currently missing. You can help the Overwatch Wiki by adding them! Village
Strategy details missing.
Shrine
Strategy details missing.
Sanctum
Strategy details missing.
|

|
TBA RATING | TBA FEATURE
Map strategy details for Oasis are currently missing. You can help the Overwatch Wiki by adding them! City Center
Strategy details missing.
Gardens
Strategy details missing.
University
Strategy details missing.
|

|
TBA RATING | TBA FEATURE
Map strategy details for Samoa are currently missing. You can help the Overwatch Wiki by adding them! Beach
Strategy details missing.
Downtown
Strategy details missing.
Volcano
Strategy details missing.
|
Escort
| Map | Strategy & Stage Tips |
|---|---|
 Overall Strategy |
TBA RATING | TBA FEATURE
Map strategy details for Overall Strategy are currently missing. You can help the Overwatch Wiki by adding them!
|

|
TBA RATING | TBA FEATURE
Map strategy details for Circuit Royal are currently missing. You can help the Overwatch Wiki by adding them! Attack
Strategy details missing.
Defense
Strategy details missing.
|

|
TBA RATING | TBA FEATURE
Map strategy details for Dorado are currently missing. You can help the Overwatch Wiki by adding them! Attack
Strategy details missing.
Defense
Strategy details missing.
|

|
TBA RATING | TBA FEATURE
Map strategy details for Havana are currently missing. You can help the Overwatch Wiki by adding them! Attack
Strategy details missing.
Defense
Strategy details missing.
|

|
TBA RATING | TBA FEATURE
Map strategy details for Junkertown are currently missing. You can help the Overwatch Wiki by adding them! Attack
Strategy details missing.
Defense
Strategy details missing.
|

|
TBA RATING | TBA FEATURE
Map strategy details for Rialto are currently missing. You can help the Overwatch Wiki by adding them! Attack
Strategy details missing.
Defense
Strategy details missing.
|

|
TBA RATING | TBA FEATURE
Map strategy details for Route 66 are currently missing. You can help the Overwatch Wiki by adding them! Attack
Strategy details missing.
Defense
Strategy details missing.
|

|
TBA RATING | TBA FEATURE
Map strategy details for Shambali Monastery are currently missing. You can help the Overwatch Wiki by adding them! Attack
Strategy details missing.
Defense
Strategy details missing.
|

|
TBA RATING | TBA FEATURE
Map strategy details for Watchpoint: Gibraltar are currently missing. You can help the Overwatch Wiki by adding them! Attack
Strategy details missing.
Defense
Strategy details missing.
|
Hybrid
| Map | Strategy & Stage Tips |
|---|---|
 Overall Strategy |
TBA RATING | TBA FEATURE
Map strategy details for Overall Strategy are currently missing. You can help the Overwatch Wiki by adding them!
|
 Blizzard World |
TBA RATING | TBA FEATURE
Map strategy details for Blizzard World are currently missing. You can help the Overwatch Wiki by adding them! Attack
Strategy details missing.
Defense
Strategy details missing.
|

|
TBA RATING | TBA FEATURE
Map strategy details for Eichenwalde are currently missing. You can help the Overwatch Wiki by adding them! Attack
Strategy details missing.
Defense
Strategy details missing.
|

|
TBA RATING | TBA FEATURE
Map strategy details for Hollywood are currently missing. You can help the Overwatch Wiki by adding them! Attack
Strategy details missing.
Defense
Strategy details missing.
|

|
TBA RATING | TBA FEATURE
Map strategy details for King's Row are currently missing. You can help the Overwatch Wiki by adding them! Attack
Strategy details missing.
Defense
Strategy details missing.
|

|
TBA RATING | TBA FEATURE
Map strategy details for Midtown are currently missing. You can help the Overwatch Wiki by adding them! Attack
Strategy details missing.
Defense
Strategy details missing.
|
 Numbani |
TBA RATING | TBA FEATURE
Map strategy details for Numbani are currently missing. You can help the Overwatch Wiki by adding them! Attack
Strategy details missing.
Defense
Strategy details missing.
|

|
TBA RATING | TBA FEATURE
Map strategy details for Paraíso are currently missing. You can help the Overwatch Wiki by adding them! Attack
Strategy details missing.
Defense
Strategy details missing.
|
Push
| Map | Strategy & Stage Tips |
|---|---|
 Overall Strategy |
TBA RATING | TBA FEATURE
Map strategy details for Overall Strategy are currently missing. You can help the Overwatch Wiki by adding them!
|

|
TBA RATING | TBA FEATURE
Map strategy details for Colosseo are currently missing. You can help the Overwatch Wiki by adding them! Pushing
Strategy details missing.
Defending
Strategy details missing.
|

|
TBA RATING | TBA FEATURE
Map strategy details for Esperança are currently missing. You can help the Overwatch Wiki by adding them! Pushing
Strategy details missing.
Defending
Strategy details missing.
|

|
TBA RATING | TBA FEATURE
Map strategy details for New Queen Street are currently missing. You can help the Overwatch Wiki by adding them! Pushing
Strategy details missing.
Defending
Strategy details missing.
|

|
TBA RATING | TBA FEATURE
Map strategy details for Runasapi are currently missing. You can help the Overwatch Wiki by adding them! Pushing
Strategy details missing.
Defending
Strategy details missing.
|
Flashpoint
| Map | Strategy & Stage Tips |
|---|---|
 Overall Strategy |
TBA RATING | TBA FEATURE
Map strategy details for Overall Strategy are currently missing. You can help the Overwatch Wiki by adding them!
|

|
TBA RATING | TBA FEATURE
Map strategy details for Aatlis are currently missing. You can help the Overwatch Wiki by adding them! Station
Strategy details missing.
Garden
Strategy details missing.
Town Center
Strategy details missing.
Bazaar
Strategy details missing.
Resort
Strategy details missing.
|

|
TBA RATING | TBA FEATURE
Map strategy details for New Junk City are currently missing. You can help the Overwatch Wiki by adding them! Arena
Strategy details missing.
The Ducts
Strategy details missing.
Refinery
Strategy details missing.
Junkyard
Strategy details missing.
Bomb Flats
Strategy details missing.
|

|
TBA RATING | TBA FEATURE
Map strategy details for Suravasa are currently missing. You can help the Overwatch Wiki by adding them! Market
Strategy details missing.
Garden
Strategy details missing.
Palace
Strategy details missing.
Temple
Strategy details missing.
Ruins
Strategy details missing.
|
Hero Challenges
| Name | Icon | Description | Reward |
|---|---|---|---|
|
|
Deal 1200 critical damage without respawning in Quick or Competitive Play. |  | |
|
|
Eliminate 3 enemies with a single use of your ultimate in Quick or Competitive Play. |  |
Trivia
- Anran's main weapon is her paired Zhuque fans that can release fire on their tops' edge via technology like Wuyang's Xuanwu staff.[2][3] Contrary, during the Null Sector invasion of Chengdu, she fought with her fire fists.[4]
- Anran's hairstyle changed after the Null Sector invasion, sporting a hybrid style of her previous one and the current Wuyang's.[3]
- Anran is narratively a huge Lúcio fan.
- The Zhuque, the Vermillion Bird represented by Anran, is the Wuxing representation of the fire element.
- Anran has a cat allergy.[5]
- Anran is the third character to have a 6.0 movement speed along with Genji and Tracer.
- Anran is the 3rd Hero to utilize two unique ultimates (after D.Va and Symmetra).
Etymology
- Anran's Chinese name is "安燃", literally meaning "burn safely".
- The "Rán" part of her name contains the radical "火" (huǒ), which is the radical classifying the word as fire-related.
- When paired together with her brother Wuyang's name, it sounds like the common Chinese idiom 安然无恙 (ān rán wú yàng), meaning "safe and sound".
Development

Anran in the Christmas 2025 post
Prior to her official reveal, various hints existed for Anran being a playable hero, including:
- Anran was invited to join Overwatch at the same time as Wuyang.[2]
- She cameoed with the game's other heroes in a Christmas 2025 post.[6]
- In January 2026, Anran's ultimate voice lines were leaked in which she says "scorch the sky."[7]
Facelift
Anran's original 3D portrait
Anran's redesign
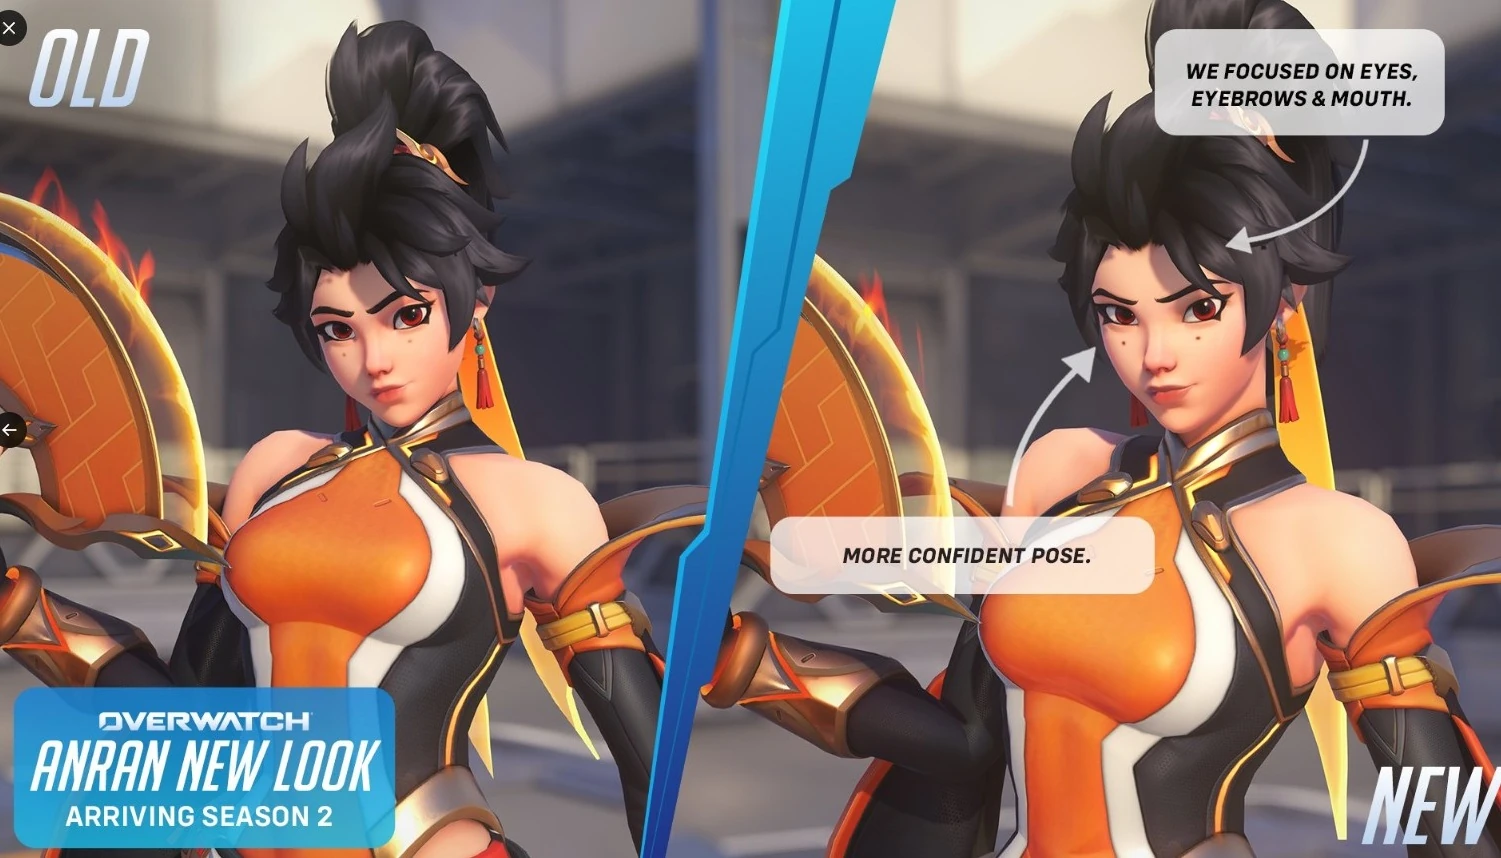
Anran's in-game appearance's facial features were softened compared to her earlier cinematic and facial ones.[8] The facial redesign was a subject of controversy within the fanbase, with negative comparisons made to Kiriko and Juno in light of Anran's softer features. Anran's voice actress, Fareeha Andersen, made a video requesting Blizzard Entertainment to make Anran similar to her original design. Aaron Keller later stated that Team 4 intended to update Anran's appearance.[9] It was later confirmed that Anran's appearance would be updated to coincide with the launch of Season 2. According to Keller, "We want our heroes to feel unique, but we also want their visuals to match their personalities, and we feel like we didn’t quite land that when Anran first released. We think she could come across older and that her original version was too innocent and playful. Anran is confident, determined, fierce, and a natural born leader, and we want her visuals in-game to convey that personality."[10]
Anran's 'facelift' incorporated the following elements:
- A more focused look to her eyes
- A more confident smirk
- More defined cheekbones and jaw, with a slightly wider smile and mouth
- Darker shading and freckles
- A more confident poise[11]
Balance Change Log
- For more information, see Patch Notes.
Perk Costs
- Minor Perk cost reduced by 7%.
- Major Perk cost reduced by 5%.
- Impact damage increased from 5 to 6.
- Impact damage reduced from 50 to 30.
- Now heals Anran for 50 health on the first target hit and 25 health for each subsequent target.
![]() Hungering Blaze – Major Perk
Hungering Blaze – Major Perk
- Changed.
- Increases the healing of Dancing Blaze’s subsequent strikes by 25.
- Will now automatically climb over small ledges.
- Jump height while active increased by 20%.
- Cooldown reduced from 8.5 to 8 seconds.
- Increased the distance you can move while active from 1.5 to 2.25 meters.
- Impact damage increased from 20 to 22.
- Impact damage now uses beam damage against armor mitigation (Only reduced by 30% when used on armor).
- Can now be canceled with quick melee.
![]() Ignition - Passive
Ignition - Passive
- Burning build up linger time increased from 3 to 4 seconds.
- Impact damage increased from 4 to 5
- Maximum ammo increased from 8 to 10
- Maximum vertical height reduced by 20%
- Added "Hold to use Inferno Rush" hero option
- Cooldown reduced from 10 to 8 seconds
- Cleansing effect removed
References
- ↑ @AskFareeha X, Accessed on 2026-02-20
- ↑ 2.0 2.1 2025-08-21, Elemental Kin | Wuyang Hero Trailer | Overwatch 2. Youtube, accessed on 2025-08-21
- ↑ 3.0 3.1 2025-08-21, Water Fire Cognate | Wuyang Hero Trailer | Overwatch 2 (CHIN). Youtube, accessed on 2025-08-22
- ↑ Against the Tide
- ↑ Jetpack Cat/Quotes
- ↑ 2025-12-26, Anran in an overwatch official post. Reddit, accessed on 2025-12-26
- ↑ 2026-01-14, Overwatch Cavalry. X, accessed on 2026-01-14
- ↑ 2026-02-05, Overwatch’s ‘Same Face Syndrome’ Has Claimed Another Victim. Kotaku, accessed on 2026-02-06
- ↑ 2026-02-09, Overwatch Actor Calls Out Her Hero’s ‘Ozempic-Chic’ Character Design As Fans Beg For Changes. Kotaku, accessed on 2026-02-10
- ↑ 2026-04-06, Overwatch Reveals The Anran Redesign Fans Begged For. Kotaku, accessed on 2026-04-07
- ↑ 2026-04-07, PlayOverwatch. X, accessed on 2026-04-07
| Heroes in Overwatch
| ||||||||
|---|---|---|---|---|---|---|---|---|
Tank |
 Bruiser |
|||||||
 Initiator |
||||||||
 Stalwart |
||||||||
Damage |
Flanker |
 Anran |
||||||
 Recon |
||||||||
 Sharpshooter |
||||||||
 Specialist |
||||||||
Support |
 Medic |
|||||||
 Survivor |
||||||||
 Tactician |
||||||||


