Domina is a Stalwart Tank hero in Overwatch. She was one of the five heroes released in Season 1: Conquest on 10 February 2026, making her the 47th hero to be added to the game.
Overview[]
Hero Selecetion
Domina is the heiress and lead negotiator of Vishkar Corporation. As a perfectionist, she's capable of dominating the fight, commanding space for her allies. With her masterful use of Hard-light, she possesses the necessary abilities to keep opponents away while dealing devastating damage.
-
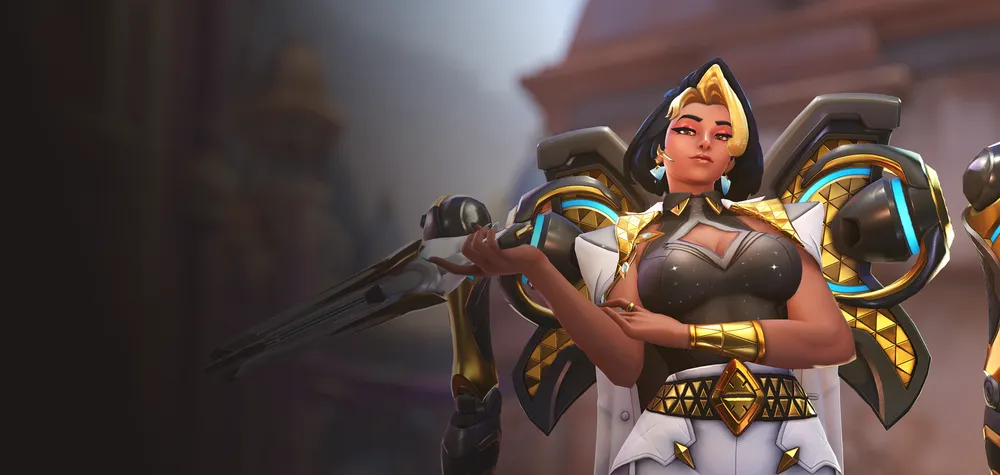
 Key Art
-
 3D portrait
 -
 2D portrait

Abilities[]
Passive Abilities[]


- Ultimate charge and perk progress generation from damage and healing dealt to heroes with the Role: Tank passive is reduced by 40%.
- All tanks have 150 more health in Role Queue. The amount of armor and/or shields remains the same.
- No longer grants increased base health.
- Ultimate charge generation reduction reduced from 40% to 20%.

- Reduces the speed of knockback and the effectiveness of slowdown effects received by 40%.

- Only restores Domina's shield hit points. Does not restore Barrier Array.
- Ability damage refers to her
 Sonic Repulsors,
  Crystal Charge and
  Panopticon.
 - Restores shields if doing ability damage to players only.
Weapons[]


60 (hitscan shot)
5 (beam over time)
5 (hitscan shot)
- The beam can be paused at any moment prior to the hitscan shot.
- This will reset the progress towards the hitscan shot.
- Even if you have less than 10 ammo remaining, the shot will still culminate to the hitscan before needing to reload.
- Damage per second: roughly ~86 while firing (~77 overall w/reload) [needs further testing]
Special Abilities[]

- Each segment has individual health and can be destroyed individually.
- There is a total of 27 barrier segments, totalling 6075 barrier health across all of them.
- There are 9 segments per row, with 3 rows.
- The barrier is formed as a semi-circle from where placed.
- The cooldown starts once the barrier is placed, not once the duration ends.
- Cooldown increased from 14 to 17 seconds.

40 (wall impact)
0.5 seconds (stun)
- If a target is pushed into an environmental wall, they will be stunned.
- The
 Power Move major perk allows Barrier Array to be treated as an environmental wall for this.
- The

100 - 50 (explosion)
- Cooldown begins after the projectile is shot, not once detonated.
- Will detonate early if it collides with the environment.
Ultimate Ability[]

300 - 100 (barrier health-based implosion)
0.2 meters (direct hit damage)
0.2 meters (matrix interaction)
- The barrier(s) completely surround the affected target(s) in a spherical design.
- Each barrier can be damaged and destroyed. Allied heroes can help destroy the barrier.
- A destroyed barrier will not detonate.
- A damaged barrier will do less damage when detonating.
- The barrier acts and interacts as a typical Barrier for every ability, completely surrounding targets hit. This means:
- Sombra's
 EMP can destroy the barrier(s).
 - Certain abilities that do not pierce barriers (such as
 Transcendence and
  Sound Barrier) are blocked by the barrier. However, they can still affect others if they enter the encased barrier.
- Sombra's
- Panopticon can encase
 B.O.B. (though if he keeps shooting, he can break the barrier in 3.3 seconds), it can also contain
  Self-Destruct, but only if the barrier is on the mech before the D.Va activates the ultimate.
 - While encased, Zarya cannot use her
 Particle Barrier or
  Projected Barrier.
 - The barrier cannot be cleansed and will persist if the target enters or exits a phasing ability (such as
 Swift Step or
  Recall).
- The implosion damage can however be avoided while Phased or Invulnerable.
- The only known way to directly cleanse the barrier is by D.Va, who in pilot form can use
 Call Mech to completely remove it.
Perks[]
Minor Perks[]
A Minor Perk is unlocked at level 2.


Major perks[]
A Major Perk is unlocked at level 3.

- Only the final explosion damage applies the slow, the initial damage over time does not.

- Only the wall impact damage is amplified by 100%, the initial knockback damage is not amplified.
Strategy[]
Domina is an architectural, Poke-oriented Stalwart Tank who commands space through overwhelming visual and physical geometry. Lacking any innate mobility options, she relies heavily on strict positioning, long sightlines, and her massive, segmented ![]() Barrier Array to dictate the flow of the battlefield. Her playstyle rewards a methodical, perfectionist approach: she thrives when she can bunker down, poke enemies from afar with
Barrier Array to dictate the flow of the battlefield. Her playstyle rewards a methodical, perfectionist approach: she thrives when she can bunker down, poke enemies from afar with ![]() Crystal Charge and
Crystal Charge and ![]() Photon Magnum, and brutally punish anyone who attempts to breach her personal space using
Photon Magnum, and brutally punish anyone who attempts to breach her personal space using ![]() Sonic Repulsors. Because of her
Sonic Repulsors. Because of her ![]() Reconstruction passive, her personal survivability is directly tied to her offensive ability accuracy.
Reconstruction passive, her personal survivability is directly tied to her offensive ability accuracy.
- General
- Domina has no movement abilities and a massive hitbox (partially due to her trailing cybernetic arms). You must proactively rotate between cover and objective points before the enemy team collapses on you.
- As a Stalwart tank, she inherently takes 40% less knockback and suffers 40% less from slow effects. Use this to aggressively hold your ground against displacement abilities like
 Soundwave or
  Concussive Blast.
 - Domina’s personal health pool is primarily composed of Shields (400 of her base 500 HP). If your
 Barrier Array breaks, play corners and allow the global support passive to trigger, naturally regenerating the vast majority of your health pool without taxing your Support players.
 Reconstruction (Passive)
- This passive is the core of your mid-fight sustain. Dealing ability damage (which excludes your Photon Magnum primary fire) directly restores your personal Shield health for 75% of the damage dealt.
- Hitting multiple targets with the AoE explosion of Crystal Charge can grant a massive, instantaneous burst of Shield regeneration. For example, catching three enemies in a 100-damage explosion instantly restores 225 Shields.
- This weapon requires tracking followed immediately by flick-aiming. The continuous beam deals steady 60 DPS, but the true threat is the 60-damage hitscan shot it culminates in. Because the hitscan shot has a 1.5x critical multiplier (dealing 90 damage), you should consistently aim for the upper chest, dragging up to the head for the final pulse.
- Pausing your fire resets the charge progress. In close-quarters duels, it is often better to hold the trigger down completely rather than feathering it, ensuring you trigger the high-burst hitscan shot.
- If you select the Extended Power minor perk at Level 2, your beam range increases to 30 meters, allowing you to comfortably contest Sharpshooter damage heroes like Ashe or Hanzo from the safety of your backline.
- Unlike traditional barriers (like Reinhardt's or Sigma's) that break all at once, Barrier Array is composed of 27 individual segments. If an enemy wants to shoot through it, they must break a specific 225-HP panel to open a "window". You can actively strafe behind your array to hide behind unbroken panels.
- The 14-second cooldown begins the moment the array is placed. If it survives its full 8-second duration, you will only have to wait 6 seconds before deploying a completely fresh array.
- Selecting the Efficient Design minor perk gives this ability excellent self-sustain utility, instantly granting you 50 Shields and triggering your passive health regeneration the moment you cast it.
- This is your definitive anti-dive tool. If an Initiator Tank like Doomfist or Winston jumps into your backline, use Sonic Repulsors to violently push them away.
- Positioning is crucial to maximizing its lethality. Striking an enemy into a wall doubles the ability's damage (from 40 to 80) and applies a 0.5-second stun, leaving them completely vulnerable to a follow-up hitscan shot from your Photon Magnum.
- Unlocking the Power Move major perk at Level 3 completely redefines this ability. It allows you to use your own Barrier Array as the "wall" to trigger the stun, whilst simultaneously granting a +100% damage boost to the impact. You can cast your array directly behind an enemy and blast them into it for a devastating 120-damage burst.
- Since Crystal Charge pierces enemy barriers, it is an incredible tool for harassing heavily fortified enemy comps. Shoot it through an enemy Ramattra or Sigma shield and detonate it manually when it passes their frontline.
- The projectile deals a minor 50 damage-over-time effect to targets near it while it travels. Try to skim it closely past enemies before detonating it to maximize the damage dealt (and therefore, the Shields generated by your Reconstruction passive).
- The Disruptive Detonation major perk applies a heavy 30% slow to anyone caught in the final explosion. Use this to peel for your supports or to prevent a Flanker from escaping around a corner.
- Panopticon is one of the most powerful isolation tools in the game. Firing the globule at a key target traps them in an icosahedron barrier, completely cutting off their line of sight to their team.
- Because the icosahedron acts as a true two-way barrier, external healing abilities cannot pass through it. Trapping an enemy Tank inside Panopticon completely cuts them off from their Ana or Baptiste, ensuring a quick elimination.
- Enemies trapped inside must make a difficult choice: they can either shoot Domina and her team, or they can shoot the 450-HP cage to break it. If they fail to break the cage, it implodes for up to 300 damage. Focus fire the trapped target to ensure they die to the implosion.
- Be aware that abilities like Sombra's EMP will instantly destroy the cage, completely nullifying your ultimate.
Match-Ups and Team Synergy[]
Tank[]
| Hero | Match-Up | Team Synergy |
|---|---|---|
 D.Va |
MEDIUM PRIORITY TARGET | MEDIUM RISK
D.Va's mobility allows her to easily bypass your
If D.Va casts |
This Synergy can only occur in Gamemodes with no role-locks or if an Echo is present. GOOD SYNERGY D.Va covers Domina's biggest weakness: a complete lack of mobility. While Domina anchors the objective and pokes from behind her Barrier Array, D.Va can contest high ground and chase down fleeing Sharpshooters. Furthermore, if Domina traps an enemy in
|
 Domina |
MIRROR MATCHUP | MEDIUM RISK
Matchup details for Domina are currently missing. You can help the Overwatch Wiki by adding them!
|
This Synergy can only occur in Gamemodes with no role-locks or if an Echo is present. TBA SYNERGY Team synergy details with Domina are currently missing. You can help the Overwatch Wiki by adding them!
|
 Doomfist |
LOW PRIORITY TARGET | LOW RISK
Domina's Stalwart passive severely cripples Doomfist's playstyle. Because you take 40% less knockback, his Rocket Punch and Seismic Slam will barely displace you from your favored sightlines. If he attempts to dive your backline, use
Be careful not to mindlessly fire |
This Synergy can only occur in Gamemodes with no role-locks or if an Echo is present. SITUATIONAL SYNERGY Doomfist wants to dive fast, while Domina wants to engage in a slow, methodical poke phase. Their pacings clash significantly. However, trapping an evasive enemy Support in
|
 Hazard |
TBA MATCHUP OR PRIORITY | TBA RISK
Matchup details for Hazard are currently missing. You can help the Overwatch Wiki by adding them!
|
This Synergy can only occur in Gamemodes with no role-locks or if an Echo is present. TBA SYNERGY Team synergy details with Hazard are currently missing. You can help the Overwatch Wiki by adding them!
|
 Junker Queen |
TBA MATCHUP OR PRIORITY | TBA RISK
Matchup details for Junker Queen are currently missing. You can help the Overwatch Wiki by adding them!
|
This Synergy can only occur in Gamemodes with no role-locks or if an Echo is present. TBA SYNERGY Team synergy details with Junker Queen are currently missing. You can help the Overwatch Wiki by adding them!
|
 Mauga |
EXTREMELY HIGH PRIORITY TARGET | EXTREME RISK
Matchup details for Mauga are currently missing. You can help the Overwatch Wiki by adding them!
|
This Synergy can only occur in Gamemodes with no role-locks or if an Echo is present. TBA SYNERGY Team synergy details with Mauga are currently missing. You can help the Overwatch Wiki by adding them!
|
 Orisa |
TBA MATCHUP OR PRIORITY | TBA RISK
Matchup details for Orisa are currently missing. You can help the Overwatch Wiki by adding them!
|
This Synergy can only occur in Gamemodes with no role-locks or if an Echo is present. TBA SYNERGY Team synergy details with Orisa are currently missing. You can help the Overwatch Wiki by adding them!
|
 Ramattra |
HIGH PRIORITY TARGET | EXTREME RISK
Ramattra is a nightmare for Domina. His Nemesis Form Pummel pierces completely through your
If he activates |
This Synergy can only occur in Gamemodes with no role-locks or if an Echo is present. EXCELLENT SYNERGY Domina's Barrier Array provides Ramattra a massive, safe haven to poke with his Void Accelerator in his Omnic form. When the enemy is softened up and Ramattra switches to Nemesis form to brawl, your Crystal Charge can pierce enemy barriers to help him secure eliminations on retreating targets.
|
 Reinhardt |
LOW PRIORITY TARGET | LOW RISK
Domina excels at breaking down Reinhardt. Your
If he attempts to pin you with Charge, your Stalwart passive prevents you from being knocked far if he clips you, and you can forcefully stop his momentum entirely with |
This Synergy can only occur in Gamemodes with no role-locks or if an Echo is present. POOR SYNERGY Both are relatively static tanks that want to control space, but they overlap too heavily. Reinhardt wants to close the gap and swing his hammer, which inherently forces him to walk completely past your Barrier Array, leaving it uselessly behind him. Together, they lack vertical mobility and dive potential.
|
 Roadhog |
HIGH PRIORITY TARGET | EXTREME RISK
Matchup details for Roadhog are currently missing. You can help the Overwatch Wiki by adding them!
|
This Synergy can only occur in Gamemodes with no role-locks or if an Echo is present. TBA SYNERGY Team synergy details with Roadhog are currently missing. You can help the Overwatch Wiki by adding them!
|
 Sigma |
MEDIUM PRIORITY TARGET | MEDIUM RISK
Matchup details for Sigma are currently missing. You can help the Overwatch Wiki by adding them!
|
This Synergy can only occur in Gamemodes with no role-locks or if an Echo is present. TBA SYNERGY Team synergy details with Sigma are currently missing. You can help the Overwatch Wiki by adding them!
|
 Winston |
HIGH PRIORITY TARGET | HIGH RISK
Matchup details for Winston are currently missing. You can help the Overwatch Wiki by adding them!
|
This Synergy can only occur in Gamemodes with no role-locks or if an Echo is present. TBA SYNERGY Team synergy details with Winston are currently missing. You can help the Overwatch Wiki by adding them!
|
 Wrecking Ball |
MEDIUM PRIORITY TARGET | LOW RISK
The Stalwart passive makes it incredibly difficult for Wrecking Ball to effectively displace you with Grappling Claw. If he uses Piledriver, you can instantly hit him with
If he deploys |
This Synergy can only occur in Gamemodes with no role-locks or if an Echo is present. GOOD SYNERGY Wrecking Ball causes massive displacement and chaos in the backline, constantly turning enemies around to face him. This allows Domina the time and space to set up her Barrier Array and freely charge her Photon Magnum hitscan shots into the backs of distracted enemies.
|
 Zarya |
MEDIUM PRIORITY TARGET | MEDIUM RISK
Matchup details for Zarya are currently missing. You can help the Overwatch Wiki by adding them!
|
This Synergy can only occur in Gamemodes with no role-locks or if an Echo is present. TBA SYNERGY Team synergy details with Zarya are currently missing. You can help the Overwatch Wiki by adding them!
|
Damage[]
| Hero | Match-Up | Team Synergy |
|---|---|---|
 Anran |
TBA MATCHUP OR PRIORITY | TBA RISK
Matchup details for Anran are currently missing. You can help the Overwatch Wiki by adding them!
|
TBA SYNERGY
Team synergy details with Anran are currently missing. You can help the Overwatch Wiki by adding them!
|
 Ashe |
TBA MATCHUP OR PRIORITY | TBA RISK
Matchup details for Ashe are currently missing. You can help the Overwatch Wiki by adding them!
|
TBA SYNERGY
Team synergy details with Ashe are currently missing. You can help the Overwatch Wiki by adding them!
|
 Bastion |
TBA MATCHUP OR PRIORITY | TBA RISK
Matchup details for Bastion are currently missing. You can help the Overwatch Wiki by adding them!
|
TBA SYNERGY
Team synergy details with Bastion are currently missing. You can help the Overwatch Wiki by adding them!
|
 Cassidy |
TBA MATCHUP OR PRIORITY | TBA RISK
Matchup details for Cassidy are currently missing. You can help the Overwatch Wiki by adding them!
|
TBA SYNERGY
Team synergy details with Cassidy are currently missing. You can help the Overwatch Wiki by adding them!
|
 Echo |
TBA MATCHUP OR PRIORITY | TBA RISK
Matchup details for Echo are currently missing. You can help the Overwatch Wiki by adding them!
|
TBA SYNERGY
Team synergy details with Echo are currently missing. You can help the Overwatch Wiki by adding them!
|
 Emre |
TBA MATCHUP OR PRIORITY | TBA RISK
Matchup details for Emre are currently missing. You can help the Overwatch Wiki by adding them!
|
TBA SYNERGY
Team synergy details with Emre are currently missing. You can help the Overwatch Wiki by adding them!
|
 Freja |
TBA MATCHUP OR PRIORITY | TBA RISK
Matchup details for Freja are currently missing. You can help the Overwatch Wiki by adding them!
|
TBA SYNERGY
Team synergy details with Freja are currently missing. You can help the Overwatch Wiki by adding them!
|
 Genji |
TBA MATCHUP OR PRIORITY | TBA RISK
Matchup details for Genji are currently missing. You can help the Overwatch Wiki by adding them!
|
TBA SYNERGY
Team synergy details with Genji are currently missing. You can help the Overwatch Wiki by adding them!
|
 Hanzo |
TBA MATCHUP OR PRIORITY | TBA RISK
Matchup details for Hanzo are currently missing. You can help the Overwatch Wiki by adding them!
|
TBA SYNERGY
Team synergy details with Hanzo are currently missing. You can help the Overwatch Wiki by adding them!
|
 Junkrat |
TBA MATCHUP OR PRIORITY | TBA RISK
Matchup details for Junkrat are currently missing. You can help the Overwatch Wiki by adding them!
|
TBA SYNERGY
Team synergy details with Junkrat are currently missing. You can help the Overwatch Wiki by adding them!
|
 Mei |
TBA MATCHUP OR PRIORITY | TBA RISK
Matchup details for Mei are currently missing. You can help the Overwatch Wiki by adding them!
|
TBA SYNERGY
Team synergy details with Mei are currently missing. You can help the Overwatch Wiki by adding them!
|
 Pharah |
TBA MATCHUP OR PRIORITY | TBA RISK
Matchup details for Pharah are currently missing. You can help the Overwatch Wiki by adding them!
|
TBA SYNERGY
Team synergy details with Pharah are currently missing. You can help the Overwatch Wiki by adding them!
|
 Reaper |
TBA MATCHUP OR PRIORITY | TBA RISK
Matchup details for Reaper are currently missing. You can help the Overwatch Wiki by adding them!
|
TBA SYNERGY
Team synergy details with Reaper are currently missing. You can help the Overwatch Wiki by adding them!
|
Shion |
TBA MATCHUP OR PRIORITY | TBA RISK
Matchup details for Shion are currently missing. You can help the Overwatch Wiki by adding them!
|
TBA SYNERGY
Team synergy details with Shion are currently missing. You can help the Overwatch Wiki by adding them!
|
 Sierra |
TBA MATCHUP OR PRIORITY | TBA RISK
Matchup details for Sierra are currently missing. You can help the Overwatch Wiki by adding them!
|
TBA SYNERGY
Team synergy details with Sierra are currently missing. You can help the Overwatch Wiki by adding them!
|
 Sojourn |
TBA MATCHUP OR PRIORITY | TBA RISK
Matchup details for Sojourn are currently missing. You can help the Overwatch Wiki by adding them!
|
TBA SYNERGY
Team synergy details with Sojourn are currently missing. You can help the Overwatch Wiki by adding them!
|
 Soldier: 76 |
TBA MATCHUP OR PRIORITY | TBA RISK
Matchup details for Soldier: 76 are currently missing. You can help the Overwatch Wiki by adding them!
|
TBA SYNERGY
Team synergy details with Soldier: 76 are currently missing. You can help the Overwatch Wiki by adding them!
|
 Sombra |
HIGH PRIORITY TARGET | EXTREME RISK
Sombra is Domina's hardest counter in the Damage role. Her
Furthermore, getting Hacked locks you out of your |
STRONG SYNERGY
Because Domina's
|
 Symmetra |
TBA MATCHUP OR PRIORITY | TBA RISK
Matchup details for Symmetra are currently missing. You can help the Overwatch Wiki by adding them!
|
TBA SYNERGY
Team synergy details with Symmetra are currently missing. You can help the Overwatch Wiki by adding them!
|
 Torbjörn |
TBA MATCHUP OR PRIORITY | TBA RISK
Matchup details for Torbjörn are currently missing. You can help the Overwatch Wiki by adding them!
|
TBA SYNERGY
Team synergy details with Torbjörn are currently missing. You can help the Overwatch Wiki by adding them!
|
 Tracer |
LOW PRIORITY TARGET | MEDIUM RISK
Tracer's extreme mobility makes hitting your
If Tracer sticks you with a Pulse Bomb, it will deal heavy damage to your massive frame, but because 80% of your health consists of Shields, you can naturally recover the damage by simply playing passively for a few seconds. |
GOOD SYNERGY
Domina is completely static, while Tracer is permanently mobile. This dichotomy works well under the 2026 Sub-Role paradigm. Because Tracer is a Flanker, she receives 325 HP from large health packs, allowing her to operate entirely independently in the enemy backline while Domina acts as the unbreakable anvil on the main objective.
|
 Vendetta |
TBA MATCHUP OR PRIORITY | TBA RISK
Matchup details for Vendetta are currently missing. You can help the Overwatch Wiki by adding them!
|
TBA SYNERGY
Team synergy details with Vendetta are currently missing. You can help the Overwatch Wiki by adding them!
|
 Venture |
TBA MATCHUP OR PRIORITY | TBA RISK
Matchup details for Venture are currently missing. You can help the Overwatch Wiki by adding them!
|
TBA SYNERGY
Team synergy details with Venture are currently missing. You can help the Overwatch Wiki by adding them!
|
 Widowmaker |
LOW PRIORITY TARGET | LOW RISK
Domina is the ultimate counter to Sharpshooters. Your
You can actively harass her out of her sniper perches from across the map by launching a |
EXCEPTIONAL SYNERGY
Setting up a
|
Support[]
| Hero | Match-Up | Team Synergy |
|---|---|---|
 Ana |
TBA MATCHUP OR PRIORITY | TBA RISK
Matchup details for Ana are currently missing. You can help the Overwatch Wiki by adding them!
|
TBA SYNERGY
Team synergy details with Ana are currently missing. You can help the Overwatch Wiki by adding them!
|
 Baptiste |
TBA MATCHUP OR PRIORITY | TBA RISK
Matchup details for Baptiste are currently missing. You can help the Overwatch Wiki by adding them!
|
TBA SYNERGY
Team synergy details with Baptiste are currently missing. You can help the Overwatch Wiki by adding them!
|
 Brigitte |
TBA MATCHUP OR PRIORITY | TBA RISK
Matchup details for Brigitte are currently missing. You can help the Overwatch Wiki by adding them!
|
TBA SYNERGY
Team synergy details with Brigitte are currently missing. You can help the Overwatch Wiki by adding them!
|
 Illari |
TBA MATCHUP OR PRIORITY | TBA RISK
Matchup details for Illari are currently missing. You can help the Overwatch Wiki by adding them!
|
TBA SYNERGY
Team synergy details with Illari are currently missing. You can help the Overwatch Wiki by adding them!
|
 Jetpack Cat |
TBA MATCHUP OR PRIORITY | TBA RISK
Matchup details for Jetpack Cat are currently missing. You can help the Overwatch Wiki by adding them!
|
TBA SYNERGY
Team synergy details with Jetpack Cat are currently missing. You can help the Overwatch Wiki by adding them!
|
 Juno |
TBA MATCHUP OR PRIORITY | TBA RISK
Matchup details for Juno are currently missing. You can help the Overwatch Wiki by adding them!
|
TBA SYNERGY
Team synergy details with Juno are currently missing. You can help the Overwatch Wiki by adding them!
|
 Kiriko |
MEDIUM PRIORITY TARGET | LOW RISK
Matchup details for Kiriko are currently missing. You can help the Overwatch Wiki by adding them!
|
TBA SYNERGY
Team synergy details with Kiriko are currently missing. You can help the Overwatch Wiki by adding them!
|
 Lifeweaver |
TBA MATCHUP OR PRIORITY | TBA RISK
Matchup details for Lifeweaver are currently missing. You can help the Overwatch Wiki by adding them!
|
TBA SYNERGY
Team synergy details with Lifeweaver are currently missing. You can help the Overwatch Wiki by adding them!
|
 Lúcio |
TBA MATCHUP OR PRIORITY | TBA RISK
Matchup details for Lúcio are currently missing. You can help the Overwatch Wiki by adding them!
|
TBA SYNERGY
Team synergy details with Lúcio are currently missing. You can help the Overwatch Wiki by adding them!
|
 Mercy |
TBA MATCHUP OR PRIORITY | TBA RISK
Matchup details for Mercy are currently missing. You can help the Overwatch Wiki by adding them!
|
TBA SYNERGY
Team synergy details with Mercy are currently missing. You can help the Overwatch Wiki by adding them!
|
 Mizuki |
TBA MATCHUP OR PRIORITY | TBA RISK
Matchup details for Mizuki are currently missing. You can help the Overwatch Wiki by adding them!
|
TBA SYNERGY
Team synergy details with Mizuki are currently missing. You can help the Overwatch Wiki by adding them!
|
 Moira |
TBA MATCHUP OR PRIORITY | TBA RISK
Matchup details for Moira are currently missing. You can help the Overwatch Wiki by adding them!
|
TBA SYNERGY
Team synergy details with Moira are currently missing. You can help the Overwatch Wiki by adding them!
|
 Wuyang |
TBA MATCHUP OR PRIORITY | TBA RISK
Matchup details for Wuyang are currently missing. You can help the Overwatch Wiki by adding them!
|
TBA SYNERGY
Team synergy details with Wuyang are currently missing. You can help the Overwatch Wiki by adding them!
|
 Zenyatta |
TBA MATCHUP OR PRIORITY | TBA RISK
Matchup details for Zenyatta are currently missing. You can help the Overwatch Wiki by adding them!
|
TBA SYNERGY
Team synergy details with Zenyatta are currently missing. You can help the Overwatch Wiki by adding them!
|
Map Strategies[]
Control[]
| Map | Strategy & Stage Tips |
|---|---|
 Overall Strategy |
TBA RATING | TBA FEATURE
Map strategy details for Overall Strategy are currently missing. You can help the Overwatch Wiki by adding them!
|
 Antarctic Peninsula |
TBA RATING | TBA FEATURE
Map strategy details for Antarctic Peninsula are currently missing. You can help the Overwatch Wiki by adding them! Labs
Strategy details missing.
Sublevel
Strategy details missing.
Icebreaker
Strategy details missing.
|

|
TBA RATING | TBA FEATURE
Map strategy details for Busan are currently missing. You can help the Overwatch Wiki by adding them! Downtown
Strategy details missing.
Sanctuary
Strategy details missing.
MEKA Base
Strategy details missing.
|

|
TBA RATING | TBA FEATURE
Map strategy details for Ilios are currently missing. You can help the Overwatch Wiki by adding them! Lighthouse
Strategy details missing.
Well
Strategy details missing.
Ruins
Strategy details missing.
|

|
TBA RATING | TBA FEATURE
Map strategy details for Lijiang Tower are currently missing. You can help the Overwatch Wiki by adding them! Control Center
Strategy details missing.
Garden
Strategy details missing.
Night Market
Strategy details missing.
|

|
TBA RATING | TBA FEATURE
Map strategy details for Nepal are currently missing. You can help the Overwatch Wiki by adding them! Village
Strategy details missing.
Shrine
Strategy details missing.
Sanctum
Strategy details missing.
|

|
TBA RATING | TBA FEATURE
Map strategy details for Oasis are currently missing. You can help the Overwatch Wiki by adding them! City Center
Strategy details missing.
Gardens
Strategy details missing.
University
Strategy details missing.
|

|
TBA RATING | TBA FEATURE
Map strategy details for Samoa are currently missing. You can help the Overwatch Wiki by adding them! Beach
Strategy details missing.
Downtown
Strategy details missing.
Volcano
Strategy details missing.
|
Escort[]
| Map | Strategy & Stage Tips |
|---|---|
 Overall Strategy |
TBA RATING | TBA FEATURE
Map strategy details for Overall Strategy are currently missing. You can help the Overwatch Wiki by adding them!
|

|
TBA RATING | TBA FEATURE
Map strategy details for Circuit Royal are currently missing. You can help the Overwatch Wiki by adding them! Attack
Strategy details missing.
Defense
Strategy details missing.
|

|
TBA RATING | TBA FEATURE
Map strategy details for Dorado are currently missing. You can help the Overwatch Wiki by adding them! Attack
Strategy details missing.
Defense
Strategy details missing.
|

|
TBA RATING | TBA FEATURE
Map strategy details for Havana are currently missing. You can help the Overwatch Wiki by adding them! Attack
Strategy details missing.
Defense
Strategy details missing.
|

|
TBA RATING | TBA FEATURE
Map strategy details for Junkertown are currently missing. You can help the Overwatch Wiki by adding them! Attack
Strategy details missing.
Defense
Strategy details missing.
|

|
TBA RATING | TBA FEATURE
Map strategy details for Rialto are currently missing. You can help the Overwatch Wiki by adding them! Attack
Strategy details missing.
Defense
Strategy details missing.
|

|
TBA RATING | TBA FEATURE
Map strategy details for Route 66 are currently missing. You can help the Overwatch Wiki by adding them! Attack
Strategy details missing.
Defense
Strategy details missing.
|

|
TBA RATING | TBA FEATURE
Map strategy details for Shambali Monastery are currently missing. You can help the Overwatch Wiki by adding them! Attack
Strategy details missing.
Defense
Strategy details missing.
|

|
TBA RATING | TBA FEATURE
Map strategy details for Watchpoint: Gibraltar are currently missing. You can help the Overwatch Wiki by adding them! Attack
Strategy details missing.
Defense
Strategy details missing.
|
Hybrid[]
| Map | Strategy & Stage Tips |
|---|---|
 Overall Strategy |
TBA RATING | TBA FEATURE
Map strategy details for Overall Strategy are currently missing. You can help the Overwatch Wiki by adding them!
|
 Blizzard World |
TBA RATING | TBA FEATURE
Map strategy details for Blizzard World are currently missing. You can help the Overwatch Wiki by adding them! Attack
Strategy details missing.
Defense
Strategy details missing.
|

|
TBA RATING | TBA FEATURE
Map strategy details for Eichenwalde are currently missing. You can help the Overwatch Wiki by adding them! Attack
Strategy details missing.
Defense
Strategy details missing.
|

|
TBA RATING | TBA FEATURE
Map strategy details for Hollywood are currently missing. You can help the Overwatch Wiki by adding them! Attack
Strategy details missing.
Defense
Strategy details missing.
|

|
TBA RATING | TBA FEATURE
Map strategy details for King's Row are currently missing. You can help the Overwatch Wiki by adding them! Attack
Strategy details missing.
Defense
Strategy details missing.
|

|
TBA RATING | TBA FEATURE
Map strategy details for Midtown are currently missing. You can help the Overwatch Wiki by adding them! Attack
Strategy details missing.
Defense
Strategy details missing.
|
 Numbani |
TBA RATING | TBA FEATURE
Map strategy details for Numbani are currently missing. You can help the Overwatch Wiki by adding them! Attack
Strategy details missing.
Defense
Strategy details missing.
|

|
TBA RATING | TBA FEATURE
Map strategy details for Paraíso are currently missing. You can help the Overwatch Wiki by adding them! Attack
Strategy details missing.
Defense
Strategy details missing.
|
Push[]
| Map | Strategy & Stage Tips |
|---|---|
 Overall Strategy |
TBA RATING | TBA FEATURE
Map strategy details for Overall Strategy are currently missing. You can help the Overwatch Wiki by adding them!
|

|
TBA RATING | TBA FEATURE
Map strategy details for Colosseo are currently missing. You can help the Overwatch Wiki by adding them! Pushing
Strategy details missing.
Defending
Strategy details missing.
|

|
TBA RATING | TBA FEATURE
Map strategy details for Esperança are currently missing. You can help the Overwatch Wiki by adding them! Pushing
Strategy details missing.
Defending
Strategy details missing.
|

|
TBA RATING | TBA FEATURE
Map strategy details for New Queen Street are currently missing. You can help the Overwatch Wiki by adding them! Pushing
Strategy details missing.
Defending
Strategy details missing.
|

|
TBA RATING | TBA FEATURE
Map strategy details for Runasapi are currently missing. You can help the Overwatch Wiki by adding them! Pushing
Strategy details missing.
Defending
Strategy details missing.
|
Flashpoint[]
| Map | Strategy & Stage Tips |
|---|---|
 Overall Strategy |
TBA RATING | TBA FEATURE
Map strategy details for Overall Strategy are currently missing. You can help the Overwatch Wiki by adding them!
|

|
TBA RATING | TBA FEATURE
Map strategy details for Aatlis are currently missing. You can help the Overwatch Wiki by adding them! Station
Strategy details missing.
Garden
Strategy details missing.
Town Center
Strategy details missing.
Bazaar
Strategy details missing.
Resort
Strategy details missing.
|

|
TBA RATING | TBA FEATURE
Map strategy details for New Junk City are currently missing. You can help the Overwatch Wiki by adding them! Arena
Strategy details missing.
The Ducts
Strategy details missing.
Refinery
Strategy details missing.
Junkyard
Strategy details missing.
Bomb Flats
Strategy details missing.
|

|
TBA RATING | TBA FEATURE
Map strategy details for Suravasa are currently missing. You can help the Overwatch Wiki by adding them! Market
Strategy details missing.
Garden
Strategy details missing.
Palace
Strategy details missing.
Temple
Strategy details missing.
Ruins
Strategy details missing.
|
Hero Challenges[]
| Name | Icon | Description | Reward |
|---|---|---|---|
|
|
Hit 2 or more targets at once with both Sonic Repulsors and Crystal Charge's explosion. |  | |
|
|
Hit 5 targets with a single use of Panopticon in Quick or Competitive Play. |  |
Trivia[]
- In the story time comic and YouTube video, even though her character was introduced as Vaira Singhania, the Youtube video description was the first time her hero name "Domina" was revealed.[1]
- Domina's design bears some resemblance to the scrapped hero Recluse, particularly the cybernetic arms.
- Domina (along with Emre) are the fifth and sixth trilingual heroes respectively in Overwatch (after Baptiste, Kiriko, Illari and Vendetta) as she speaks English, Hindi and Punjabi.
- On release, Domina's Reconstruction could be used on Deployables, a bug that was quickly patched.
- This resulted in situations where Crystal Charge on an enemy Domina's Barrier Array would fully restore Domina's shield health.
- Domina's ultimate Panopticon is called an icosahedron, which is a 20 sided three dimensional polygon.
- Many parts of Domina's visual animations, like her walking, shooting, ability casting, show her to be stiff as her cybernetic arms behind her do all the work, subtly hinting at her incompetence.
- She is also the only Vishkar hero to not create a construct, further implying she simply isn't as talented and/or skilled as Symmetra or Lifeweaver.
- Domina, due to her status, is the only Vishkar hero to not have an amputated arm replaced with a mechanical one, rather having 2 extras trailing behind her instead.
Videos[]
- Story Times
Balance Change Log[]
- For more information, see Patch Notes.
- Cost increased by 12%
- Barrier Panel Health reduced from 250 to 225
- Hero Updates
- General
- Roster Updates
- Domina has been added to the Tank roster
References[]
- ↑ 2026-02-02, The Upper Hand Story Time with Chiara Preziosi and Taj Atwal | Overwatch 2. YouTube, accessed on 2026-02-02
| Heroes in Overwatch
| ||||||||
|---|---|---|---|---|---|---|---|---|
Tank |
 Bruiser |
|||||||
 Initiator |
||||||||
Stalwart |
 Domina |
|||||||
Damage |
 Flanker |
|||||||
 Recon |
||||||||
 Sharpshooter |
||||||||
 Specialist |
||||||||
Support |
 Medic |
|||||||
 Survivor |
||||||||
 Tactician |
||||||||


